

Here's the quilt along schedule as a reminder:
The quilt along will start on Friday, March 1, 2019. Every two weeks, new instructions will be given here on the blog on what to work on for the next two weeks. Share you progress here with hyperlinks if you wish and/or on social media using the hashtag: #mosaicjigqal or #mosaicjigmedallionquiltIntro
Material and Fabric Requirements (March 1)
Preparation and Cutting Instructions (March 15)
Center Mosaic Medallion (March 29)
Border Blocks (April 12)
Mosaic (April 26)
Record Blocks (May 10)
Finishing (May 26)
Also, I updated the materials list to include the batting and the backing fabric. Sorry, I forgot to mention it. Please accept my apologies. There will probably be some mistakes in the instructions as well, so please tell us if you find one or two or three. : )
BG - Background Fabric
HST - Half Square Triangle
LOF - Length of Fabric (Parallel to the selvage)
Patch - Cut piece of fabric used to make a block
QST - Quarter Square Triangle
Med - Medium Fabric or Print
RST - Right Sides Together
Template - Shape used to make a patch
WOF - Width of Fabric (Cross grain of fabric or perpendicular to the selvage.)

Glue your paper templates to poster board or a piece of lightweight cardboard such as a cereal box. Cut out exactly along the seam allowance line. Please note, pictured above was an older version of the DIN A4 template sheet. Your template page will look different.

Pre-cut your pieces for the templates as written in the instructions. Finish with your selfmade templates or use your circle cutting ruler if you have one. Line up the curved edges of your template with the curve of the ruler and mark with an erasable marker or washi tape for future cuts. Cut through the slot with a 28 mm rotary cutter in an upward position (perpendicular to the cutting mat) per manufacturing directions.

I have also included a page of patch markers to identify what you have cut. Since some of the patches are cut in different fabrics, you may want to print this page three time; no patch requires more than three different fabrics per these instructions for this design. Keep your patches together, number the amount cut and set aside until we start sewing the blocks together on March 29, 2019.

Do this be folding the entire 2 yards/meters in half several times ensuring the edges are parallel on both the fold and on the selvages. Square and cut off the selvage. Measure 4 1/2" and cut. (Two pieces of fabric are cut at once, because it is folded in half across the WOF.) Measure 4 1/2" and cut for your second pair of outer borders. Cut both pairs to the correct lengths (60 1/2" & 68 1/2") or wait until the entire medallion quilt is sewn and cut to the exact length you need.

Cut out the larger pieces followed by the smaller pieces. Use a sharp rotary cutter and layer fabric whenever possible when you are using a rotary cutter. Trace templates onto the backside of your fabric (all patches are symmetrical) and cut out or use a circle cutting tool. Label all patch groups with letter as indicated.
You will notice on Template B - "Trim template back to this yellow line after all Patch B's are cut." The template will also be used to fold back the end of Patch B shortly before appliquéing. You can do this right before assembling the Record Blocks. Those instructions will follow later.
Two Template C's should be cut from one 6 1/2" x 9 1/2" rectangle as shown below. This is for ease of cutting and reduces fabric waste. Please refer to the photos below for more help on cutting.
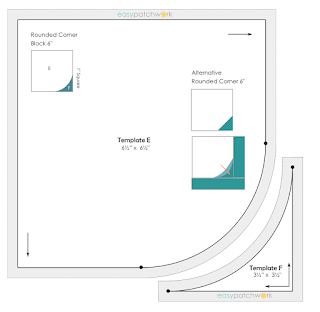
For Patches E & F, you have a choice of how to construct the block. You can either cut out patch E & F with the templates provided to make the Rounded Corner block OR you can cut out squares and "fake" the curve. This will be explained later when sewing the block together. If you are unsure of what I mean, just cut the squares for now.
Tip: Punch holes in the dots on the templates and mark your fabric through the dot with a pencil to know where they need to be pinned later.
*Cut squares as indicated. There are two different methods/designs for you to choose from. If you do not want to make the small curved piecing, cut squares for now.

Using a ruler and 45 mm rotary cutter, line up and cut the straight lines marked on the fabric for both patches. Extend the cut further than the line drawn. Please do not cut into the other drawn patch. : )

Here you can see both straight edges (not already pre-cut from the rectangular shape) of the patch are cut.

Finish the curve of the patch with a circle cutting tool. (I use the Circle Savvy Ruler.) Do so by lining up the seam allowance edge on the ruler with the seam allowance edge of the cut patch AND the cut edge of the patch with the slot of the ruler. Click on the photo to enlarge it for a better understanding.

Now you can see the patch is completely cut out. Rotate your cutting mat and repeat for the other patch.

TIP: You can also use the cardboard templates to make these cut, but please be extra careful!! Also, I find it easier, being a right-handed person, to cut in a clockwise direction when cutting the inside curve of a template rather than a counterclockwise direction. Why? Because the cardboard template holds the fabric in place when cutting in a clockwise direction. If you do it the other way, nothing is pressing and holding your fabric in place. Try it out and see what works better for you. You can always use scissors to cut the patches out.

And that my dear ladies (and gents) concludes the great cutting event of the Mosaic Jig QAL. I look forward to seeing your cut fabrics. You can link up with the linky party below.

If you have any questions, please don't hesitate to contact me. I will do my best to answer.

Please join us on March 29 for instructions on how to sew the Center Mosaic Medallion Block. Here's a little sneak peek to satisfy your curiousity. Have a happy and safe weekend! Happy patching (or cutting).
Copyright
All designs © 2019 Karen Ackva. All designs, illustrations, photographs and contents is copyrighted. No portion of this pattern may be copied, reprinted or distributed without written consent from Karen Ackva or easypatchwork per copyright laws. May not be used for commercial use of any kind. May not be used to teach a class nor for instructing material without written consent. For personal and private use only by the original purchaser.
A lot of time and effort is put into writing patterns. Please respect these laws. If your friends want to make the medallion quilt too, tell them where they can find the information and let them download it themselves. Thank you!
I have done my best to ensure accuracy of all the dimensions and instructions. My close, quilty friends were kind enough to be my testers, but there may be more mistakes to follow. Sorry in advance! Thank you for helping me, friends. : )
Abbreviations and Definitions
BG - Background FabricAll designs © 2019 Karen Ackva. All designs, illustrations, photographs and contents is copyrighted. No portion of this pattern may be copied, reprinted or distributed without written consent from Karen Ackva or easypatchwork per copyright laws. May not be used for commercial use of any kind. May not be used to teach a class nor for instructing material without written consent. For personal and private use only by the original purchaser.
A lot of time and effort is put into writing patterns. Please respect these laws. If your friends want to make the medallion quilt too, tell them where they can find the information and let them download it themselves. Thank you!
I have done my best to ensure accuracy of all the dimensions and instructions. My close, quilty friends were kind enough to be my testers, but there may be more mistakes to follow. Sorry in advance! Thank you for helping me, friends. : )
HST - Half Square Triangle
LOF - Length of Fabric (Parallel to the selvage)
Patch - Cut piece of fabric used to make a block
QST - Quarter Square Triangle
Med - Medium Fabric or Print
RST - Right Sides Together
Template - Shape used to make a patch
WOF - Width of Fabric (Cross grain of fabric or perpendicular to the selvage.)
Preparation
First, you will need to print out your templates. I have them listed here on my Instant Downloads page of my website. Choose from DIN A4 or Letter Size according to your printer and convenience. Please make sure you have no-scaling selected when printing. I accidentally had "fit to page" selected when I initially printed and wondered why all of my templates were a little smaller than required. You can imagine my relief when I realized it was a simple mistake. Please print at 100%. Verify the one-inch square on each page. You can cross-reference the templates with the size written on the templates as well.
Glue your paper templates to poster board or a piece of lightweight cardboard such as a cereal box. Cut out exactly along the seam allowance line. Please note, pictured above was an older version of the DIN A4 template sheet. Your template page will look different.

Pre-cut your pieces for the templates as written in the instructions. Finish with your selfmade templates or use your circle cutting ruler if you have one. Line up the curved edges of your template with the curve of the ruler and mark with an erasable marker or washi tape for future cuts. Cut through the slot with a 28 mm rotary cutter in an upward position (perpendicular to the cutting mat) per manufacturing directions.

I have also included a page of patch markers to identify what you have cut. Since some of the patches are cut in different fabrics, you may want to print this page three time; no patch requires more than three different fabrics per these instructions for this design. Keep your patches together, number the amount cut and set aside until we start sewing the blocks together on March 29, 2019.

Even if you will be cutting the patches later and working section for section, please cut the outer border patches T & U first, along the LOF.
Do this be folding the entire 2 yards/meters in half several times ensuring the edges are parallel on both the fold and on the selvages. Square and cut off the selvage. Measure 4 1/2" and cut. (Two pieces of fabric are cut at once, because it is folded in half across the WOF.) Measure 4 1/2" and cut for your second pair of outer borders. Cut both pairs to the correct lengths (60 1/2" & 68 1/2") or wait until the entire medallion quilt is sewn and cut to the exact length you need.

Cutting Instructions
To make cutting fun for all of us, I wrote out two different ways to cut your fabric. For those of you who like to read and cut strip-for-strip, faric-for-fabric, there is a Text Version for the cutting. For those of you who like to read in a table form and basically cut each block, there is a second cutting version. Choose which one works best for you. The table version will also aid in a scrappy design of the medallion quilt and will be used for future posts as a patch guide.Cut out the larger pieces followed by the smaller pieces. Use a sharp rotary cutter and layer fabric whenever possible when you are using a rotary cutter. Trace templates onto the backside of your fabric (all patches are symmetrical) and cut out or use a circle cutting tool. Label all patch groups with letter as indicated.
You will notice on Template B - "Trim template back to this yellow line after all Patch B's are cut." The template will also be used to fold back the end of Patch B shortly before appliquéing. You can do this right before assembling the Record Blocks. Those instructions will follow later.
Two Template C's should be cut from one 6 1/2" x 9 1/2" rectangle as shown below. This is for ease of cutting and reduces fabric waste. Please refer to the photos below for more help on cutting.
 |
For Patches E & F, you have a choice of how to construct the block. You can either cut out patch E & F with the templates provided to make the Rounded Corner block OR you can cut out squares and "fake" the curve. This will be explained later when sewing the block together. If you are unsure of what I mean, just cut the squares for now.
Tip: Punch holes in the dots on the templates and mark your fabric through the dot with a pencil to know where they need to be pinned later.

Cutting Instructions (Text Version)
Follow these instructions if you prefer to cut all of your patches fabric-for-fabric.
Accent
(7) Strips – 2 ¼” x WOF – Binding (S)
(2) Strips – 1¼” x WOF. Subcut (4) 1¼” x 20 ½” rectangles. (R)
(2) Strips – 4 ⅝” x WOF. Subcut (5) 4 ⅝” x 4 ⅝” squares. Cut once diagonally to get (10) HST’s. (H)
(3) Strips – 4 ¼” x WOF. Subcut to (21) 4 ¼” x 4 ¼” squares. Cut twice diagonally to get (84) QST’s. (I)
(3) Strips – 2 ⅜” x WOF. Subcut (46) squares 2 ⅜” x 2 ⅜”. Cut once diagonally to get (92) HST’s. (J)
(4) Squares – 3 ½” x 3 ½”. Cut (4) Template D’s.
(2) Strips – 2” x WOF. Cut (40) Template A’s.
Main
(4) Strips – 4 ½” x length of fabric. Subcut (2) 4 ½” x 60 ½” rectangles (T) and (2) 4 ½” x 68 ½” rectangles (U).
*(4) Squares – 3 ½” x 3 ½”. Cut 4 Template F’s.
(2) Strips – 5” x WOF (31”). Subcut (8) 5” x 5” squares. Cut (8) Template B’s.
(2) Strips – 8 ¾” x WOF (31”). Subcut (4) 8 ¾” x 8 ¾” squares. Cut twice diagonally to get (16) QST’s. (G)
(1) Strips – 4 ⅝” x WOF. (8) Squares – 4 ⅝” x 4 ⅝”. Subcut to get (16) HST’s. (H)
(8) Squares – 4 ¼” x 4 ¼”. Subcut twice diagonally to get (32) QST’s. (I)
(2) Strips – 2 ⅜ x WOF (31”). Subcut (10) squares 2 ⅜” x 2 ⅜”. Cut once diagonally to get a total of (20) squares. (J)
(1) Strip – 2 ⅝” x WOF (31”). Subcut (12) squares 2 ⅝” x 2 ⅝”. Use previous strips to compensate. (M)
Medium 1
(2) Strips – 5” x WOF. Subcut (16) 5”x 5” squares. Cut (16) Template B’s.
(2) Squares – 5 ¾” x 5 ¾”. (K)
(1) Strip 2 ⅝” x WOF. Subcut (10) 2 ⅝” x 2 ⅝” squares. (M)
Medium 2
(2) Strips – 5” x WOF. Subcut (16) 5”x 5” squares. Cut (16) Template B’s.
(2) Squares – 5 ¾” x 5 ¾”. (K)
(1) Strip – 2 ⅝” x WOF. Subcut (10) 2 ⅝” x 2 ⅝” squares. (M)
Background
(4) Strips – 9 ½” x WOF. Subcut (20) rectangles 6 ½” x 9 ½”. Cut (2) Template C’s from each rectangle for a total of (40) Template C’s.
(4) Strips – 1 ¾” x WOF. Subcut (8) rectangles 1 ¾” x 20 ½”. (Q)
(4) Squares – 3 ½” x 3 ½” for the background of the Dot Blocks (DB).
*(4) Squares – 6 ½” x 6 ½”. Cut 4 Template E’s.
(2) Squares – 8 ¾” x 8 ¾”. Subcut (8) QST’s. (G)
(1) Strip – 4 ⅝” x WOF. Subcut (5) squares 4 ⅝” x 4 ⅝”. Cut once diagonally to get a total of (10) HST’s. (H)
(5) Squares – 4 ¼” x 4 ¼”. Subcut twice diagonally to get (24) QST’s. (I)
(1) Strip – 5 ¾” x WOF. Subcut (4) squares 5 ¾” x 5 ¾”. (K)
(6) Squares 4 ¼” x 4 ¼”. (L)
(1) Strip – 2” x WOF. Subcut (20) squares 2” x 2”. (N)
(1) Strip – 3 ½” x WOF. Subcut (20) rectangles 2” x 3 ½”. (O)
(1) Strip – 5 ½” x WOF. Subcut and compensate to get (8) rectangles 3 ½” x 5 ½”. (P) *Cut squares as indicated. There are two different methods/designs for you to choose from. If you do not want to make the small curved piecing, cut squares for now.
Cutting Instructions (Table Version)
Cross reference this chart against the patches cut.
You can also use this chart if you wish to make your quilt scrappy. Cut the number of patches according to the fabric given.
Total Number of Patches
Shape
Patch
Dimension in Inches
Subcut
Accent
Main
Med 1
Med 2
BG
Templates
A
2 x 2
A
40
B
5 x 5
B
8
16
16
C
6 ½ x 6 ½
C
40
D
3 ½ x 3 ½
D
4
E*
6 ½ x 6 ½
E
4*
F*
3 ½ x 3 ½
F
4*
Triangles
G
8 ¾ x 8 ¾
(4) QST
16
8
H
4 ⅝ x 4 ⅝
(2) HST
10
16
10
I
4 ¼ x 4 ¼
(4) QST
84
32
24
J
2 ⅜ x 2 ⅜
(2) HST
92
20
Squares
DB
3 ½ x 3 ½
4
K
5 ¾ x 5 ¾
2
2
4
L
4 ¼ x 4 ¼
6
M
2 ⅝ x 2 ⅝
12
10
10
N
2 x 2
20
Rectangles
O
2 x 3 ½
20
P
3 ½ x 5 ½
8
Q
1 ¾ x 20 ½
8
R
1¼ x 20 ½
4
S
2 ¼ x WOF
7
T
4 ½ x 60 ½
2
U
4 ½ x 68 ½
2
*If you do not want to make the small curved piecing, cut squares and follow Method 2 for the Rounded Corner Blocks as listed on the templates. If not, cut templates with rounded corners.
Also, when cutting HST and QST, divide the total number needed by 2 for HST and divide by 4 for QST. Otherwise, you will have too many if you don't.
Update and correction.
Total Number of Patches
|
||||||||
Shape
|
Patch
|
Dimension in Inches
|
Subcut
|
Accent
|
Main
|
Med 1
|
Med 2
|
BG
|
Templates
|
A
|
2 x 2
|
A
|
40
|
||||
B
|
5 x 5
|
B
|
8
|
16
|
16
|
|||
C
|
6 ½ x 6 ½
|
C
|
40
|
|||||
D
|
3 ½ x 3 ½
|
D
|
4
|
|||||
E*
|
6 ½ x 6 ½
|
E
|
4*
|
|||||
F*
|
3 ½ x 3 ½
|
F
|
4*
|
|||||
Triangles
|
G
|
8 ¾ x 8 ¾
|
(4) QST
|
16
|
8
|
|||
H
|
4 ⅝ x 4 ⅝
|
(2) HST
|
10
|
16
|
10
|
|||
I
|
4 ¼ x 4 ¼
|
(4) QST
|
84
|
32
|
24
|
|||
J
|
2 ⅜ x 2 ⅜
|
(2) HST
|
92
|
20
|
||||
Squares
|
DB
|
3 ½ x 3 ½
|
4
|
|||||
K
|
5 ¾ x 5 ¾
|
2
|
2
|
4
|
||||
L
|
4 ¼ x 4 ¼
|
6
|
||||||
M
|
2 ⅝ x 2 ⅝
|
12
|
10
|
10
|
||||
N
|
2 x 2
|
20
|
||||||
Rectangles
|
O
|
2 x 3 ½
|
20
|
|||||
P
|
3 ½ x 5 ½
|
8
|
||||||
Q
|
1 ¾ x 20 ½
|
8
|
||||||
R
|
1¼ x 20 ½
|
4
|
||||||
S
|
2 ¼ x WOF
|
7
|
||||||
T
|
4 ½ x 60 ½
|
2
|
||||||
U
|
4 ½ x 68 ½
|
2
|
||||||
Also, when cutting HST and QST, divide the total number needed by 2 for HST and divide by 4 for QST. Otherwise, you will have too many if you don't.
Update and correction.
Cutting Template C - a Mini Pictorial Tutorial
Pre-cut your rectangles to 6 1/2" x 9 1/2". Lay your template on the fabric and trace twice on the backside of your fabric rectangle. You can use a pencil or erasable marker and the lines will disappear. If you use a pen, they will not.
Using a ruler and 45 mm rotary cutter, line up and cut the straight lines marked on the fabric for both patches. Extend the cut further than the line drawn. Please do not cut into the other drawn patch. : )

Here you can see both straight edges (not already pre-cut from the rectangular shape) of the patch are cut.

Finish the curve of the patch with a circle cutting tool. (I use the Circle Savvy Ruler.) Do so by lining up the seam allowance edge on the ruler with the seam allowance edge of the cut patch AND the cut edge of the patch with the slot of the ruler. Click on the photo to enlarge it for a better understanding.

Now you can see the patch is completely cut out. Rotate your cutting mat and repeat for the other patch.

TIP: You can also use the cardboard templates to make these cut, but please be extra careful!! Also, I find it easier, being a right-handed person, to cut in a clockwise direction when cutting the inside curve of a template rather than a counterclockwise direction. Why? Because the cardboard template holds the fabric in place when cutting in a clockwise direction. If you do it the other way, nothing is pressing and holding your fabric in place. Try it out and see what works better for you. You can always use scissors to cut the patches out.

And that my dear ladies (and gents) concludes the great cutting event of the Mosaic Jig QAL. I look forward to seeing your cut fabrics. You can link up with the linky party below.

If you have any questions, please don't hesitate to contact me. I will do my best to answer.

Please join us on March 29 for instructions on how to sew the Center Mosaic Medallion Block. Here's a little sneak peek to satisfy your curiousity. Have a happy and safe weekend! Happy patching (or cutting).
This patch markers are such a good idea!! Thanks for that :-)
ReplyDeleteWhen you have this many different patches, it is essential that everything is labeled. There was a small update to the table if you already downloaded. Sorry for the inconvenience.
DeleteI have never cut everything in advance and I am still thinking about the fabrics but I am with you and very much looking forward to your mystery. Thank you for your organization. The cutting table looks great.
ReplyDeleteGreetings from Bonn
Martina
Take your time. Enjoy.
DeleteBisher habe ich noch nie alles für einen so großen Quilt im Vorraus zugeschnitten - aber da ich es bei QALs nicht mag, jede Woche wieder die Stoffe rauszukramen und neu zu überlegen. freue ich mich schon sehr über diese neue Erfahrung!
ReplyDeleteLiebe Grüße
Ines
Ich habe noch nie ein QAL mitgemacht und alles vorab zugeschnitten. Herzlichen Dank für deine Hilfe!💘 LG, Karen
DeleteDarf ich dich fragen, welches Kurven Lineal du hast bzw. Welches kannst du empfehlen?
ReplyDeleteLg Margit
Hi Margin! Ich arbeite mit dem Circle Savvy Ruler von Creative Grids. Ich habe ein Blopost "minimal waste drunkards path" und mehrere Lineal genannt. Danke für die Frage. LG, Karen
DeleteSorry Margit. Ich hatte nicht den Absicht gehabt dein Name falsch zu schreiben. : ( Bitte entschuldige mich.
DeleteDanke für die Mühe die Du Dir machst. Ich schneide Block für Block zu, das geht mit Deiner Tabelle ohne Probleme
ReplyDeleteLiebe Grüße Katrin W.