Friday, May 24, 2019

finishing - mosaic jig qal

Thanks for joining us for last edition of our quilt along instructions. Are you all caught up? Did you figure out the design or is it still a mystery?


Thank you for sharing your progress photos and quilting along with us. We truly appreciate it. I hope you have had as much fun as we have had!


Here is a reminder of previous posts if you missed one.

Intro
Material and Fabric Requirements (March 1)
Preparation and Cutting Instructions (March 15)
Center Mosaic Medallion (March 29)
Border One (April 12)
Mosaic Blocks (April 26)
Record Blocks (May 10)
Finishing (May 26)
Show and Tell (June 28)*

*We will have one more post, where you can show off all of your hard work and share your Mosaic Jig Medallion quilt.

Preparation & Reminders

Please read through the instructions before you begin. You should have knowledge of sewing as well as how to use templates to complete this quilt.
  • Use high quality patchwork/quilting fabrics and thread for longer endurance.
  • All dimensions are given in inches.
  • Use a scant 1/4" seam allowance for all seams unless otherwise given.
  • Finger press as you go. Press with a warm iron to set your seams. Do not use steam to set seams.
  • Use a 2.0 stitch length for smaller blocks. Use a 2.0 - 2.5 stitch length for larger blocks.
  • Clip off dog ears as you sew. 
  • Backstitch at the starting and stopping points when sewing curves.
Additionally, if you are using a translator to translate this information, the fractions will probably be lost in the translation. Please print out the original dimensions.

Copyright

All designs and templates are protected under copyright laws and may not be photocopied, duplicated or reproduced in any form other than the original purchaser for personal, private use. No commercial use of any kind is granted without the written consent from Karen Ackva or easypatchwork. May not be used as teaching material nor used in sellable items. All designs © Karen Ackva - easypatchwork.


Finishing

Our last assignment is also intermediate level. Again, we will be sewing curves on the last block, Rounded Corner block, using the leftover Patches E & F, but you may also choose the "cheater way" and fake it with a cathedral window style curve.Again, it is very important that you sew curves with a smaller stitch than normal - about 2.0 on your machine as well as with your needle position down so you can maintain a consistent flow when rotating your fabric on the curves. Here are the instructions as a PDF for added help.

Here is what you need to cut to finish off the design:


Total Number of Patches
Shape
Patch
Dimension in Inches
Subcut
 Accent
   Main
 Med 1
Med 2
    BG
Templates
E*
6 ½ x 6 ½
E


4*
F*
3 ½ x 3 ½
F

4*


Rectangles
S
2 ¼ x WOF

7


T
4 ½ x 60 ½


2


U
4 ½ x 68 ½


2


* Cut squares as indicated. There are two different methods/designs for you to choose from for these patches. If you do not want to make the small curved piecing, cut squares and follow Method 2 for the Rounded Corner Blocks. If not, cut templates with rounded corners.


Making the Rounded Corner Blocks

First you need to decide if you want to make the blocks using curved piecing or go for the cheater method. The cheater method or fake piecing uses the same type of construction as you would when making cathedral windows.

Method One

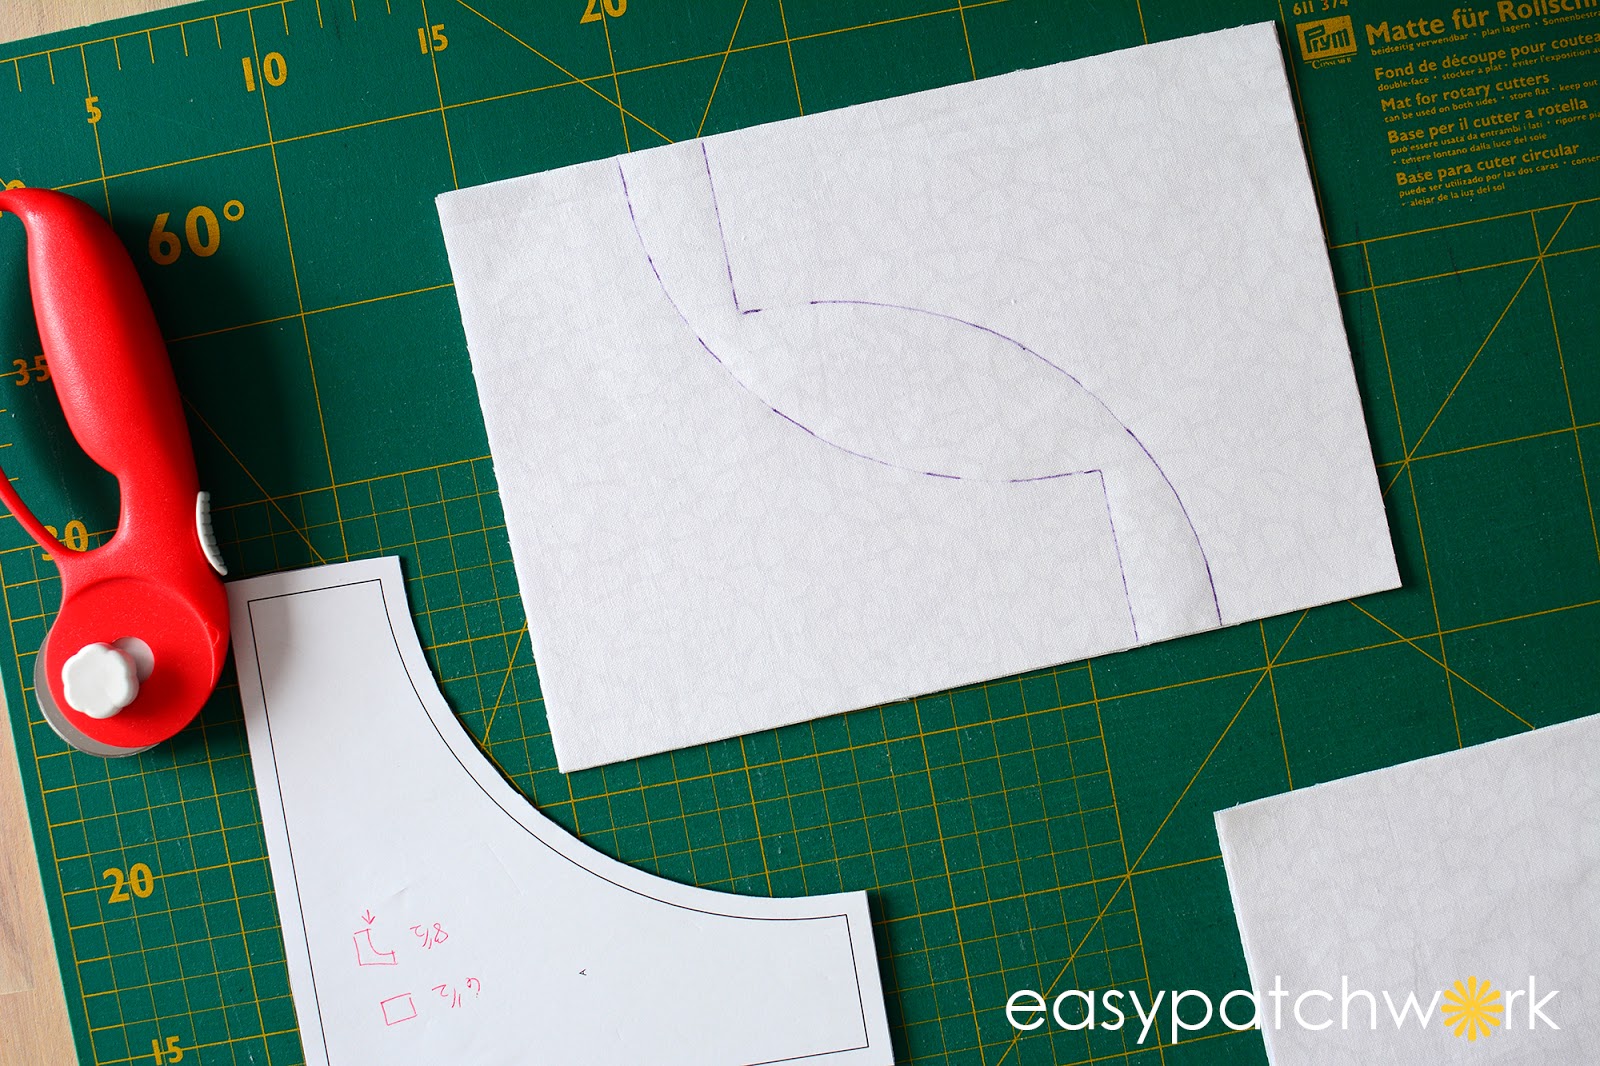
Cut out your squares. Use the templates to finish the rounded corners of the patches. Poke a hole in the templates with a straight pin and transfer the mark on to the wrong side of the patches using a non-permanent marker or washable pen. Line up the marks of Patch E and Patch F (right sides together) and pin in place. Fill with as many pins as you need to sew the curve. I personally think I overdid the amount in the photo. : ) Make sure you set a pin in each of the dots - this will be the starting and stopping points and will need a couple of backstitches to secure the seam.


Take the block over to your sewing machine. Backstitch at the beginning of your seam. Sew, rotating the block with your left hand gently and sew the curve slowly. When you get to the last pin, backstitch.


Press the corner patch outwards. If the curve doesn't look exactly curvy, set it aside and come back to it after you practice a few more times. (I think I sewed this one a second time.)


Method Two

If you have ever made a Cathedral Window quilt or pillow case, you are familiar with this next method.

Cut your the required squares Patches E & F.


Take the smaller square and fold in half diagonally.


Place the folded square in the upper right corner matching up the raw edges . Pin in place. Baste with a 1/8th seam allowance with a 3,0 stitch length.


Now you can use this patch as you would any other patch. Sew borders or blocks as described in the instructions. (I used some scraps just for demonstration purposes.)


You can see here that the bias (diagonal) edge is pliable and can easily be folded back.


After the entire quilt top is assembled and ready to be quilted, pull the folded edges back and pin in place. (Again, demonstration purposes. Just imagine the quilt is finished.)


Now topstitch or quilt in place.


If you compare the template to the rounded edge, you can see that they are not identical. If you want the curve to be more like the template, pull the bias edge even deeper in towards the corner.


That's it for those corner patches. Whew! Now it is time to put it all together. Layout all of your patches so this is what you see.


To keep it straight when laying out your patches, the quilt is symmetrical across the diagonal of the quilt.


Please refer to the PDF for more helpful hints when putting it all together.

When adding the borders, I generally cut a little longer than needed and trim to the edges later when squaring up both edges of the quilt.


Trouble Shooting

Here are some photos of problems that occurred when sewing everything together.

Problem: these points aren't matching up when sewing. It looks like the Record Blocks are too big. Unpick the seam where the arrows are. Try sewing the Record blocks together with a larger seam allowance to make the blocks smaller. Finish the open seam.


Problem: everything matches up, except the centers of the Record Blocks. ?!&$ It looks like the bottom block wasn't correctly sewn. Disassembled the four patch block shown below. 


Return back to this step to verify the curves are sewn correctly.


Here is what my quilt looked like when laying it out. It covers my entire floor measuring 70" x 70".


The entire quilt will remain a surprise until we all are finished. My quilt is currently at a long arm quilter having her beauty treatment. I can't wait to get it back and see how Birgit Schüller performed her magic. It is the first time Birgit, world renowned German quilt artist, is quilting one of my quilts!! I am very anxious and excited! I was privileged enough to take one of her long arm classes and fell in love with her work!

So now you have one month to sew it all together and get your quilt quilted. We run a tight ship around here, you know! We will be having a little show and tell starting June 28, 2019. Please join us then to see a parade of Mosaic Jig Medallion quilts. If you are interested in the pattern without having to read through all of the blog posts, you can also purchase the entire pattern on Etsy.


Thank you so much for dropping by! Happy quilting!
-Karen

Friday, May 10, 2019

record blocks for the mosaic jig qal

Thanks for joining us for another edition of our quilt along. I have enjoyed seeing all of your beautiful mosaic jig quilts on Instagram. You all have picked out some really gorgeous fabric combos to make this design shine.

I truly hope no one was discouraged with the last assignment? It wasn't that hard was it? Well, this (2) week will be slightly easier than the last one. Now, it is all about sewing curves.


Once again, I would like to thank each and everyone of you for reading my blog posts and participating in the quilt along. I am very honored! Thank you!

Here is a reminder of previous posts if you missed one.

Intro
Material and Fabric Requirements (March 1)
Preparation and Cutting Instructions (March 15)
Center Mosaic Medallion (March 29)
Border One (April 12)
Mosaic Blocks (April 26)
Record Blocks (May 10)
Finishing (May 26)

Preparation & Reminders

Please read through the instructions before you begin. You should have knowledge of sewing as well as how to use templates to complete this quilt.
  • Use high quality patchwork/quilting fabrics and thread for longer endurance.
  • All dimensions are given in inches.
  • Use a scant 1/4" seam allowance for all seams unless otherwise given.
  • Finger press as you go. Press with a warm iron to set your seams. Do not use steam to set seams.
  • Use a 2.0 stitch length for smaller blocks. Use a 2.0 - 2.5 stitch length for larger blocks.
  • Clip off dog ears as you sew. 
  • Backstitch at the starting and stopping points when sewing curves.
Additionally, if you are using a translator to translate this information, the fractions will probably be lost in the translation. Please print out the original dimensions.

Copyright

All designs and templates are protected under copyright laws and may not be photocopied, duplicated or reproduced in any form other than the original purchaser for personal, private use. No commercial use of any kind is granted without the written consent from Karen Ackva or easypatchwork. May not be used as teaching material nor used in sellable items. All designs © Karen Ackva - easypatchwork.


Record Blocks

This next assignment is intermediate. Sewing curves isn't every one's favorite thing to sew, but they are easier than you might think it is. Here, it is very important that you sew curves with a smaller stitch than normal - about 2.0 on your machine. Please also sew with your needle position in the down position so you can maintain a consistent flow when rotating your fabric when sewing the curves. Rotate the fabric patches with your left hand slowly while using your right hand to match up raw edges. By the way, you can download the PDF for this week's assignment here.

I personally like to sew the concave to the convex part of the circle together or the outer curve to the inner curve. To do this, you will need to find the middle of the curves by creasing both patches through the middle. Line up the creases, pin in the middle, then pin at the start and ending points. Fill with as many pins as you need to keep the patches in place. I use thin glass head pins and sew slowly directly over the needles. Yes, one or two may get broken or bent in the process. That's okay.


You can also sew the convex part of the curve to the concave. This method is from Ines at  Nähzimmerplauderein. She is a master at this technique! This never seems to work for me, but it does work. Just try it out. In this case, you would not pin the two patches together. You just hold each patch in a different hand. Pull your hands together when sewing, matching up the raw edges. Try out both methods and see which works best for you.

Cutting Instructions in Text Format


Cut the larger pieces first followed by the smaller pieces. Use a sharp rotary cutter and layer fabric. Trace templates onto the wrong side of your fabric and cut out with fabric scissors or use a circle cutting tool. Label all patch groups with letter indicated.

  • Accent Fabric: (2) Strips - 2" x WOF. Cut (40) Template A's.
  • Main: (2) Strips - 5" x WOF. Subcut (8) 5" x 5" squares. Cut (8) Template B's.
  • Medium 1: (2) Strips 5" x WOF. Subcut (16) 5" x 5" squares. Cut (16) Template B's.
  • Medium 2: (2) Strips 5" x WOF. Subcut (16) 5" x 5" squares. Cut (16) Template B's.
  • Background: (4) Strips - 9 1/2" x WOF. Subcut (20) rectangles 6 1/2" x 9 1/2". Cut (2) C's from each rectangle for a total of (40) Template C's. See figure below.


Cutting Instructions in a Table Format


Total Number of Patches
Shape
Patch
Dimension in Inches
Subcut
Accent
Main
Med 1
Med 2
BG
Templates
A
2 x 2
A
40


B
5 x 5
B

8
16
16

C*
6 ½ x 6 ½
C


40


*Use this chart if you prefer to make a scrappy version. Cut squares, then cut patches with templates. Two Patch C’s can also be cut from one 6 ½” x 9 ½” rectangle. See figure directly above on how to cut.


If you have a curved cutting ruler, first verify the correct slot for cutting. Line up the seam allowance line of the template with the seam allowance line on the cutting ruler. Then find the slot you should use for cutting. Mark with a piece of tape or an erasable marker.

To cut the patch, place the fabric square on the seam allowance line of the ruler. Next, find the right slot and cut on the outer edge of the slot with a 28mm rotary cutter in a perpendicular motion. On the smallest curve, the rotary cutter may get snagged by the acrylic ruler a bit. On the larger curves this does not happen.


Please verify the correct slot before cutting. On the Circle Savvy Ruler from Creative Grids, these are the lines you will be using:


Patch
Dimensions
Inner Curve
Outer Curve
A
2 x 2

3 ½” Slot
B
5 x 5
Use template to cut or draw line onto fabric and cut with scissors. (There is not a slot on this ruler small enough for this curve.)
9 ½” Slot
C
6 ½ x 9 ½
8 ½” Slot


When cutting Patch C, stack three to four rectangles of fabric. Transfer the straight edge of the template (or 6 1/2" edge) onto the fabric.


Cut each straight edge with a rotary cutter (here in red).


Then finish the cut with the curved ruler matching up the cut edge of the patch with the seam allowance line of the ruler.


 Rotate your cutting mat 180° and repeat for the other side (patch).


After you have all of your pieces cut, lay them out and sew B & C together. On this block, you have 40 A's in the accent fabric and 40 C's in the background fabric, so just sew them together without thinking. You will have the right amount of blocks in the correct fabric color combo in the end.

When sewing A to the B/C segment, you can either sew in the convex to concave method above or use reverse applique. This is a hybrid method of starch applique.

Step by Step - Reverse Applique

First, make a cardboard template of B if you haven't already. Trim the inner curve back to the yellow line on the template. Please note: the yellow line was added to the template after this photo was taken for better clarification.


At the ironing board, spray your B patches with starch. Press with a warm iron. Lay the template over the sewn B/C segment on the back. Cut a couple of slits into Patch B on the curved edge, BUT do not extend past the inner curve of the template. Press the cut fabric back on to the cardboard template with your fingertips.


Then take a warm iron (without steam) and set the fabric a second time.


Now take some glue (either washable stick or liquid) and put a couple of dabs on top of the pressed seam.


Place Patch A directly over the pressed seam lining up the two straight edges of Patch B with Patch A. We do this just to keep the patches in place until we can sew them. Do this with multiple patches and let them dry before you sew.


Flip everything over and top stitch with matching color thread and with a 3.0 stitch length.


And there you go! Your block should now measure 6 1/2" x 6 1/2". Take a quilt ruler and mark lines at 1 3/4" and 4 3/4" on each adjacent side of your ruler as squaring reference points. Your curves should hit those points on the ruler. If they don't meet, you may have to go back and tighten a sewn curve or loosen one. Square up on the outer edges if needed.


Okay, now I bet you are wondering how it all fits together, right? Well there is just one more block to sew. If you know how it goes together, then please finish it up. If not, stick around for the next and last assignment where will be putting it all together. Until then, you can puzzle your blocks with a possible layout. Looking forward to seeing yours! Until then, here's the last sneak peek.


Please join us on May 26, 2019, so we can put it all together. Thanks for dropping by. We look forward to seeing your progress. Please post using the hashtag: #mosaicjigqal.