Thursday, February 26, 2015

project sewing room: storage bins and totes

Were you curious to know if this was still an topic with me or that I ditched the subject? Although I haven't posted in a looong time, it is still a part of my ongoing series called project sewing room - "rund ums Nähzimmer." My other posts are about sorting your fabric and making a cutting/project table from an Ikea bookshelf. Today I want to talk about organization in storage boxes and totes.

Free tutorial from Forth Worth Fabric Studio
I recently re-organized my fabric cabinet and bought some plastic totes to store my fabrics. I wasn't totally happen with my fabrics flying around in my cabinet. I get pretty lazy sometimes when it comes to putting fabric back to the right spot. I thought a plastic basket or tote would be a good solution for storing my fabrics away in the cabinet, not getting dusty but could be pulled out easily when I wanted to rummage through a set of colors. I bought a few different sizes and am giving them a try. I should buy about three more, but we'll see how this goes for now.
  
As you can see, It looks like I have almost no fabric!! Do you believe that? I do, because my stash is slowly getting smaller and smaller. I am finding projects to help me de-stash. Of course, I did get rid of a lot of more "country" or traditional fabrics last fall by donating to another patchwork friend. She really appreciated them too. Now I am generally working in fabric collections and rarely pull from my own stash.


Colder colors are on the top shelf and warmer colors on the second shelf. My larger pieces of fabric are located on the bottom shelf. I keep most of my pre-cuts in other totes where I can grab at them easier for quick projects.

One option to get more organized is simply to buy cheap plastic totes. My new ones are stackable without lids. Since they are hidden in the cabinet, I thought that would be an overkill. I just wanted more of a quick in/out solution.


Another creative way to organize is to make your own totes or boxes. I have always loved the Ikea boxes and wanted to make them for the top shelf of my bookshelf/cabinet. I had this really great modern fabric in my stash which is a heavy woven made in England. I thought my shelf could use a bit of color and pulled it out. I managed to make my box with the dimensions 9 x 9 x 15 inches. It should have been 9 x 15 x 15, but the designer screwed up!!


It didn't seem as stable as it should have been, so I looked around the house and found my milk container box that holds 12 cartons of milk. It fit perfectly for more stability! I completely winged this pattern "freie Schnauze." But there are loads of great patterns out there!


If you are looking for some storage for holding your different types of fleece, wadding or batting, you can make this upright basket! We made it in our patchowrk group meeting this past month. You can find free directions with pattern here. The directions are in GERMAN! Die Anleitung ist in deutsch geschrieben, juhu!


I found this great little tutorial from the Forth Worth Fabric Studio for portable fabric tote.. I have honestly never made a basket tote, so this was very exciting for me! I did a pretty good job too, if I am allowed to say that.


I think if I make another one, I will either put the handles on the ends, or sew them down in the top stitching seam. I don't really like how they flap around. Check out my perfect side seam! ;-) Don't look at the quilting lines, just the green part. ;-)


I thought this could come in handy when a new baby is around...maybe for diapers, wipes, talcum powder/creme, etc. It matches the quilt in the background that I have been working on. The top is finished, I just have to quilt it. I am looking forward to that next week.

Have you made any good storage totes or boxes that you would like to share with us? If you have please drop us a note so we all can profit! Thanks for stopping by.

What did I learn this week? Making boxes and totes can be a lot of fun!

Thursday, February 19, 2015

swappin' mug rugs

Recently, I developed an interest in creating mug rugs. This is a smaller version of a miniature quilt or doll quilt. I made a lot of miniature quilts over the last two years and was in a doll quilt swap. I decided to op out, because because of my own commitment to our Pillow Swap Four Seasons. But I still have a need to "create with a theme." I love to be challenged and think!! When I discovered a mug rug swap that was upcoming and not already full, I jumped all over it! It is now full but check it out for an array of beautiful mug rug inspiration at Forth Worth Fabric Studio.

For me it is still unclear how big a mug rug is supposed to be, but I think between 4 x 6 and 6 x 8 inches. Sometimes I go a little overboard and make it a little larger. I just change the name to a mini-placemat or an XL mug rug. No matter what you call it, I think it would be used AND appreciated. Sometimes I wonder about the miniature doll quilts if anyone really does something with it. Oh, sorry, a tangent...back to my post.

My challenge, create a "spring" mug rug. That's pretty simple. I first worked on my swarm of bees! I love the paper pieced bee, but the colors of yellow, gray, black aren't very springy! I love the color palette, but not very springy, is it?


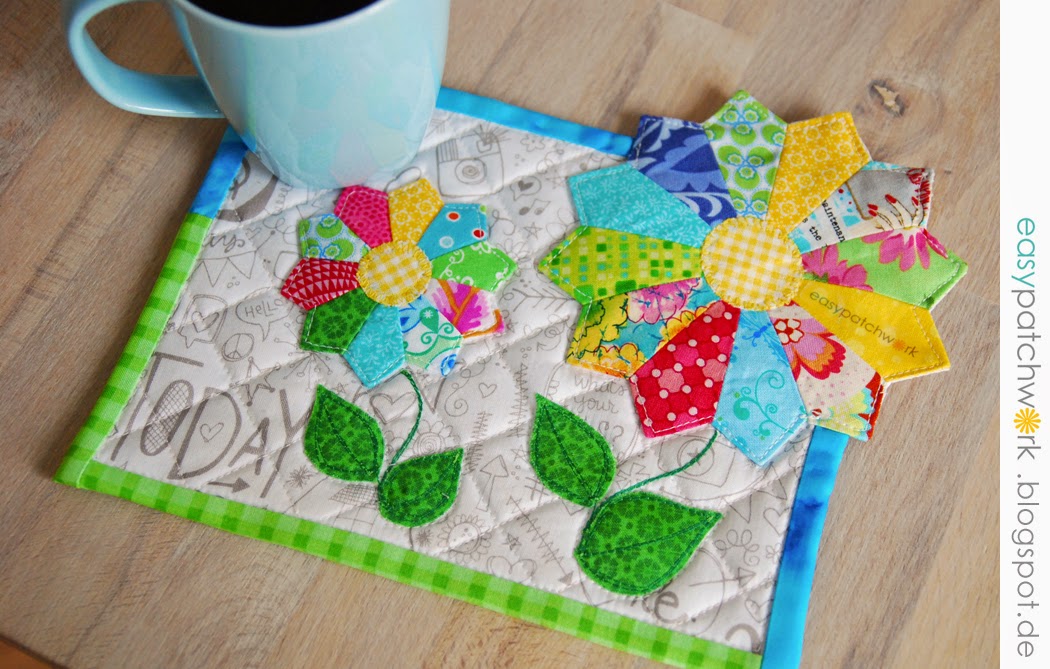
So I remembered I wanted to try out the Dresden plates featured throughout my lastest edition of the Quiltmaker. I have never made Dresdens and wanted to try out the technique. I also found a QAL featured by McCalls Quilting featuring something really good....mini Dresdens!! I love minis!! In the background you can see my freshly (sometimes) ironed and folded laundry. My sewing space doubles as the family laundry mart. ;-)


I cut enough scraps using the Dainty Dresden template from Lesson 8 (great for 1½ inch strips and scraps) and 12 plates of the larger Dresden template (Template C from Dancing Dresdens) from 2½ inch scraps. I had a lot of fun going through my scraps too. I de-stashed a lot of the darker colors and had a great mix of colorful fabrics to choose from. I tried to stay in a turquoise/yellow/pink/green colorway.

After you get the little cuties cut out, you sew them together on the longer side, RST. I chain pieced in a snap using a smaller stitch length, backstitching at the start and stop. It is worth the extra time. The pieces are really dainty, but I find it relaxing to take my time. 


Then you snip the bulk off the tips where you will turn them right side out and press. Just take your time and don't stress. They go together very easily.


Now the watch them shrink in size! Sew them all together! The little ones make three inch Dresdens! How cute! You know I am a sucker for anything mini! I think the larger ones make five inch Dresdens. I didn't measure.


I had the idea of making flowers with them. I wanted to use all of them, but there simply wasn't enough room on the 6 x 8 inch backing fabric. I would have to use the smaller ones or...let one jump right out of the mug rug!! That's a great idea, Karen! The challenge was the binding. I would have to construct it, so the flower would not be disturbed by the binding. I decided to make my binding as border strips and pull to the backside. It worked! I also hand sewed a backing fabric onto the petal the extruded over the mug rug.


I added one of my mini stickers with "easypatchwork" to the yellow petal. I thought about adding more text, but just a hint is also good. I am really pleased with it. It is bright and cheery! I am also looking forward to seeing what my swap partner comes up with. I love swappin'!

What did I learn this week? Don't short cut your binding. I prefer single fold or double-fold binding, not border strips. ;-) They were a headache for me and didn't really turn out the way I wanted them to.

Are you looking forward to spring? What are you making that is springy? I'd like to hear from you!

Saturday, February 14, 2015

spring fling

We are in the final stages of our Pillow Swap Four Seasons (PS4S) found on flickr. It is a fantastic group of international ladies, avid sewers, and creative geniuses! I am so happy and proud to be a part of this group! We have great support, great feedback, loads of pictures of our progress and our creative process. If you are thinking about joining a pillow swap, or a swap in general, feel free to drop by, get inspired and see how a flickr swap works. We would love to have you come join us to in the next round - Summer 2015. Signs-up start March 2nd and last until the 12th, 2015. Partners will be assigned the following Monday. You can find out more information here.

I am still not allowed to say who my partner is, nor what her dislikes/likes color preferences are, but I am allowed to show you the finished pillow case. ;-)


This was a little challenging for me, because I didn't know what she would want as a final design and left some options open. I first made kites and sewed white fabric to the sides.


After I decided on the final design of kaleidoscopes or stars, I finished the nine blocks. The trouble started when I tried to sew the middle blocks together. The points weren't matching up! I ripped the seams about four times in the center to get things right, but the points still were matching up the way I wanted them too. And what do you do, when your points don't match up? Put a button over them! It's just a pillow right?? Those buttons are ACCENT BUTTONS! ;-) I did very simple outline quilting. I didn't want to over do it. I wanted the "roundness" of the octagon center to come out but not disturb the other blocks.

And if my partner doesn't like the front, she can always turn it over and look at the backside for a while.  I made the braid using my MINI Hex N More ruler!! YAY!! Can you find the zipper? I strategically placed it behind the insert.

And of course I had some extra time, so I made a few goodies using the same fabric. I bought just one charm pack from the series Bluebird Park from Kate & Birdie for Moda Fabrics. I bought extra yardage of the "linen look" and separately, the turquoise bird in trees as well as a panel.


And to be honest, I didn't know if my swap partner was going to be happy with the pattern I picked. So, I made a second pillow in different dimensions this time. I decided on the 16 x 24 inch travel pillow size. I made some cute little butterflies from the charms, worked on a general design, picked up my fabric panel, sliced it in half and came up with this:


So, I am very confident that my partner is going to like her little "care package" if only she likes the fabric!? I used up most of all the fabric that I bought for this project including the charm pack. I was really surprised how far it went. 


Now who could be the lucky recipient of this spring pillow swap? I don't know, but they should receive their package the beginning of March!

I really had so much fun with this pillow swap!! I can't wait until the next one for summer. Oh, the possibilities! Please stop by and check out ALL OF THE BEAUTIFUL CREATIONS in the Pillow Swap Four Seasons flickr pool. And don't forget to sign up if your sewing schedule is free!

Thanks for stopping by!
Karen, Swap Mama

Monday, February 9, 2015

bumble bees and krapfen

Bienenstich, Erdeer-, Schokolade- und Eierlikörkrapfen
In the dead of winter, there is a very exciting holiday coming round in Germany  called Fasching. The rest of the world knows this as Fat Tuesday or Carnival. I first got to experience the liveliness of the day in New Orleans in the French Quarter back in 1995 or so. Wow, I will never forget that! I was only there once, but the memories will last a lifetime. I did manage to bring home a whole bag of beads. (You usually have to exchange a kiss for a strand.) And, I had one very special strand that hung down just about to the floor with huge two inch beads on it. I won't tell you what I did for that one. :)

And I experienced Fastnacht in Basel, Switzerland in 1999 in the very wee hours in the morning. Unforgettable! The costumes were so elaborate!! I still can't believe I took a bus at midnight to watch the parade at 2 am!

Here in Schwaben, schwäbisch-alemannische Fastnacht or Fasching is celebrated with parades of witches usually men and women belonging to an organized group who dress up like witches complete with wooden-carved masks - some that have been in the families for generations. It is definitely something to be seen. Parades of witches (Narren) will walk by and usually play some type of prank on you. Since the masks can be grüeslig, my kids prefer not to go to these types. And then there are those phrases - Hexe, Hexa, Hexa....more, more more...in dialect. A little bit of candy is "thrown" to the spectators, but not a lot.

Kinderfasching in Leipheim 2014
Then, there are the parades close to Frankfurt which are a little more entertaining with floats and funny characters not just something to scare you. These are much more entertaining for the kids. Here, lots and lots of candy is thrown from the floats just like a traditional American "parade." And of course, there is always plenty of alcohol involved! Little bottles of spirits, wine and beer are handed out to spectators. Don't forget, there is a large amount of consumption from the participants as well. I think the younger participants use it as an excuse to drink since they are allowed to drink alcohol openly starting 16. I am not a fan of the entire "Faschingsitzungen", but I do like a few things about it. It is nice to let your hair down and have some fun. =)

We celebrate Kinderfasching this week in our town. The kids will dress themselves in a costume of their choice, this year a soldier and a harem dancer. I will dress myself too; I have a few costumes stored away. There will be lots of music, food, candy and laughter.

Kinderfasching in Hüttisheim 2015
 What I especially think of at this time of year, are Krapfen. These are doughnuts filled with spiced eggnog, chocolate, Carmel, honey-creme, strawberry, etc. As an American, you can probably get this any time of the year. Living in Germany, you appreciate and savor this TREAT! The only time you can get them is between Jan. 1 and Fat Tuesday. I cannot resist these treats. I LOVE my Eierlikörkrapfen!! 

Eierlikörkrapfen und tanzende Bienchen

This delicacy is entering our home almost on a daily basis right now! I have to stop buying them, but I cannot resist. When we lived in Baden-Würrtemburg, you couldn't find them anywhere, the Eierlikör at least. You have to drive over the border to Bavaria!! Now, I live in Bavaria, so I can find them at the local bakery and patisserie. I swear, I ate my last one on Friday. I will not buy anymore!

And more appropriate to show you Krapfen as this beautiful bumble bee mug rug I am working on for a swap at fortworthfabricstudio - my swarm of bees. You can find the free template at Badskirt in the shape of a hexagon.


I like this one so much, I am not sure I am going to part with it. It doesn't really look "springy" though does it? When I think of spring, I think of fresh colors such as Easter eggs, not black, white and gray. I might redo the idea, I might not. I still have time to decide. =)

What did I learn last week? I like to embroider, I hate to hand quilt!

Thanks for dropping by.

Monday, February 2, 2015

warming up for v-day

Are you a romantic? Do you love to spoil your loved ones with sweets and chocolates on Valentine's Day? We do! My mom always made a big schabang about it with boxes of chocolates for each member of the family. Granted, this was back in the seventies and eighties when you didn't get candy on a daily basis. (That's another story though.) We would always receive a beautiful card as well thoughtfully hand picked according to our character by our our mom and dad. I am trying to pass on the excitement and tradition to my family and NO it's not just another AMERICAN import for the companies to sell more chocolates and cards!! How often do you really appreciate your family?? Okay, we spoil them with activities, presents, love, extra privileges, BUT VALENTINE's  DAY is so special. It is that one extra special day to say, "Hey! I love you more than anything else in this world!" Can you understand me here?

I started working on a mini place mat or oversized mug rug (about 8 x 10 inches) for my husband. I wanted to try out this really great PP pattern from Jenny at (Jennymakesstuff) with a slightly tilted arrow. It would be a great choice for a quick present for my husband on Valentine's Day. He always says I make too many things for other people, and we don't keep anything ourselves - meaning it is not for him. Aren't men a little sensitive sometimes? ;-)


The free arrow template went together like a dream! I used a couple 5" charms from a new V-Day charm pack. I liked the arrow and the XO (which stands for kisses and hugs), but thought there was still a little too much black going on. What to do?


I decided to add in a quick pocket for some office treats. I folded a charm in half and sewed around the outside. I went for a little outline quilting in red and black. Quick 1-2-3! I added 1 1/2" single fold binding.


The new XL mug rug is going to be the perfect gift for my sweetie on V-Day, especially since he brought home a nice loot from his last business trip to L.A.!! He went to JoAnn's Fabrics and to a really awesome quilt shop he found on his own called Sew Modern. I am also putting this on my list for online shops; the prices are great and the fabrics are fresh! This is what he brought home just for me!!


Keep in mind, he did have a list with him of what I wanted. Men need lists don't they?? But don't expect them to look at the quantities! That won't happen. = )
  • Three different plastic template sheets
  • 8" pinking scissors
  • Fiskars Titanium roll cutter
  • applique sharps (needles)
  • 5" embroidery hoop
  • 6" embroidery hoop
  • Clover Clips
  • Hex N More (large) ruler
  • FABRIC
I gave a few tips about fabrics - modern and I liked the new collection from Carolyn Friedlander - Doe, and text prints preferably in black with white writing. He forgot his list and forgot about the Doe, BUT he picked out - Kona Cotton Solids - Patchwork City Autumn, Cotton & Steel - Sarah Watts - Tokyo Train, and Tula Pink - Modern Shrine plus two yards of turquoise solids and two assorted prints! My man has great taste in fabrics!! = )

I am so excited to DIVE INTO the fabric, but I have some more projects to get out of the way first. I envision, yes, envision a quilt with that yummy fabric with the new Hex N More ruler!! There are just so many ways you can use it! Watch the videos and you will be amazed!

And what else have I been working on? I finished up my pillow for our Four Seasons Pillow Swap. I am not going to share THAT here today. That will get its own special post. =)

What did I learn this week? I HATE WORKING WITH BIASES!

Thanks for stopping by!