Showing posts with label freebie. Show all posts

Tuesday, June 8, 2021

EQ Pearls of Wisdom + Giveaway

Have you hear the news? The Electric Quilt Company is celebrating 30 years of business! It is hard to believe that another five years have gone by. It seems like just yesterday the new EQ8 version came out. What is EQ8 and the Electric Quilt Company? The EQ Company produces the leading quilt design software (EQ8) which I use just about daily in my own designs. It doesn't write the patterns for you, but it takes out all of the math guess work, cutting and dimensions are easily adapted from line drawings in the program. It even prints out templates and foundation papers. I haven't found a limitation yet to the software. It is extremely powerful with a lot of thought put into the programming and needs of quilt designers. If you are computer software savvy, it definitely makes pattern design and writing easier.


As part of the big celebration, the company has teamed up with 30 avid EQ8 users and quilt designers to share in the fun with their own "pearls of wisdom" about the software. Each week another designer will be highlighted with an interview and a giveaway - especially an EQ8 project giveaway! How cool is that? You can download the project, color (re-color or map to color/fabrics) as you wish, print templates/cutting charts and make your very own quilt (in any size)! How cool is that?!

I am very honored and humbled to be a guest participant in the big 30th anniversary celebration! Go check it out on their website to see my favorite pearls as well as other pearls from other designers.

https://doyoueq.com/blog/category/eq-pearls-of-wisdom/

My gift to EQ and to all of their users is a Fancy Color Wheel Quilt - what every quilter needs in their sewing space. 

The Fancy Color Wheel Quilt is based on a painter’s color wheel for you to sew yourself. There are two slightly different designs for you to try, one being a mini quilt (12” center block) and other a midi quilt (20” center block). There is a fancy design with triangles below and a simplified version without triangles. The patterns are made of templates (use up an empty cereal box) and is for an advanced skill level. The pattern uses a total of 51 different fabrics.

Are you familiar with the color wheel?

The color wheel is built with the primary colors forming a triangle in the center (red, yellow and blue). Turn the triangle 60° and you have the secondary colors – adjacent primary colors mixed with each other. Venturing outwards one additional ring, you will find gradients of the primary and secondary colors. The next ring shows triangles in black and white pointing to the shades and tints respectively. Sandwiched in between are the tones (main color with gray added) while the outer most ring uses a range of tints (main color mixed with white) and shades (main color mixed with black). I used the special functions of EQ8 to add tints, shades and tones more commonly known as the color value.

Color is a fascinating and powerful too that influences our perception, emotions and even our consumer behaviours. In the quilting world, we can use color to express a mood, accentuate a piece of a design, or even subdue portions. To achieve this, we must first understand the color wheel, how it is built and how colors interact with each other. 

Color Wheel Made with Solids from Doris K.

A painter's wheel is what quilter's are most drawn to in their designs. It is a mixture of color through paint or a so-called RBY color wheel. Be careful, because there is more than one type of color wheel.

Color Wheel Made with Printed Scraps by Karen Ackva

The color wheel is also divided into warm colors (red, yellow, and orange) which generate life, warmth, engery and positive emotions. Think sunrise and summertime. Cold colors convey security, relaxations, and stability. Think cool water and crisp snow. Individual colors can express their own emotions. 


In no way, shape or form am I an expert on color. Please refer to these publications for more in-depth look at color theory and everything else you would like to know.

Barnes, Christine. COLOR: The Quilter's Guide. Washington, USA: That Patchwork Place Inc. 1997

Wagner, Lauren. Palette Perfect. Barcelona, Spain: Hoaki Boos, S.L., 2018. Color Combinations Inspired by Fashion, Art & Style

As we already know, EQ8 is wonderful for printing templates, foundation patterns, calculating fabric yardage and giving us the correct patches. What it cannot do is write the pattern. If you are looking to create the pattern and prefer written instructions on how to, you can purchase the pattern on Etsy in my easypatchworkSHOP

Patterns includes seven pages DIN A4 page size and includes:

  • Material requirements 
  • Cutting instructions
  • Full-size templates
  • Block construction
  • Patch placement for all fabrics
  • Additional instructions for reverse appliqué of center circle as a second option


Enjoy an extra 30% off today only. No code necessary.

Would you like to make the pattern but are uncertain if you may have all of those pretty rainbow fabrics in your stash or scrap bins? You can always change up the colors and create your own interesting color wheel. Take a look at these ideas below. Recalculate the fabric yardage with the EQ8 Project file for any of the combinations below.

If you just love to sew curves, you can even sew an entire quilt with these XXL 20" blocks.


Thanks for dropping by today to read about the EQ "Pearls of Wisdom" and the Fancy Color Wheel Quilt Project giveway you can find on their website. Let's celebrate their success together. Happy 30th Anniversary, Electric Quilt Company! You rock!

Friday, August 14, 2020

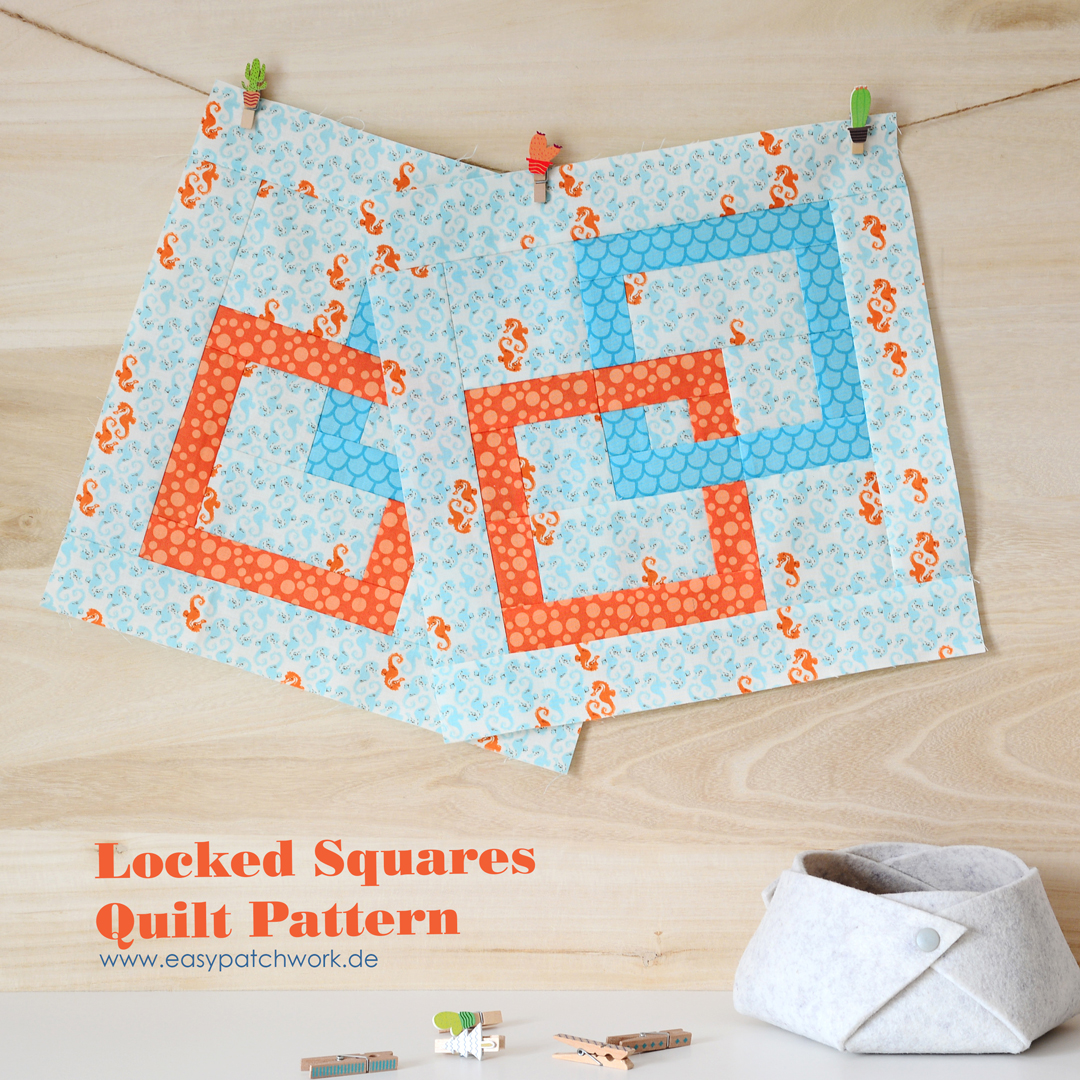
Locked Squares Tutorial and Quilt


https://www.easypatchwork.de/downloads/

Christine @minerva_huhn, asked me a few months ago to share in her love of quilting bees. She set up a forum with beginner bee blocks for new (German) quilters. Her idea was to introduce them to new blocks and get them started with their own beehives. The first of each month, she releases a new block for members to share with their bee mates. On the fifteenth of the month, a guest quilter also presents her deigner quilt block - one she thinks the newbie quilters would also like to make. The block could be self-designed or an already known block but should have the standard 12” x 12” finished dimensions. 

https://minerva-huhn.de/newbie-bee-germany/ 

When Christine asked me to join in, I was sold on the idea of helping young quilters explore their creative talents. Of course I wanted to share in the fun and quickly agreed to help. After many days of thinking and exploring blocks to present, I finally decided on my own, self-designed quilt block called, “Locked Squares.” It is a beginner block but also designed for experienced quilters. 

Do you remember the little sneak preview in my Instagram feed?


The block was designed back in February before the entire Corona-Virus Pandemic. I wanted an easy, modern and geometric block that could be used with precuts or scrap fabrics. The design should also be a scrap buster project. Quilting bees are best when you use scrappy fabrics so you can see the same block but in an array of different fabrics. Therefore, each participant can also add in fabrics if needed and all blocks look slightly different. 


This block could be made with a lot of inset seams, but I wanted it to be do-able for everyone, especially newbies. [SIDE NOTE: I actually drew up and sewed a block with inset seams that you can see on the left side of the photo posted above. Although everything lines up wonderfully, it shouldn't be used as a starter block.] So, it was broken down easily into three sections for the locked squares and then framed. I decided to frame the block to cover any inconsistencies in block sizes which can happen in quilting bees.

You can skip directly to the PDF download here. You will be redirected to the easypatchwork website. Feel free to take a look around. You might find another tutorial or download that is interesting for you. There are two versions for your convenience - English or German. I wrote a full pattern instead of a tutorial, because it is so much more practical to download a complete pattern than to scroll through text and print countless sheets of paper.

https://www.easypatchwork.de/downloads/

As you might notice, I used directional fabrics in this block. The pattern also includes cutting instructions especially for directional fabrics as well. So, you can use all of the luscious small to medium prints including stripes and other pattern repeats in your quilt.

The freebie also includes a full size quilt with twenty quilt blocks! How cool is that! That should be enough to get you and your quilting bee started on a fun quilt.


So, hop on over to the easypatchwork website for your own instant digital freebie for this quilt block and sofa quilt. Copyright clauses do apply even though it is a free pattern. Please read the pattern for more details. Have fun sewing and please share your makes with the hashtag #lockedsquares. Thanks for joining. 


A big THANKS to Ines, Tina, Carola and my husband for translations and corrections into German. 😙

Wednesday, March 20, 2019

mosaic jig block diagonal construction tutorial

Have you ever tried to sew a quilt block together on the diagonal? Did you know this might actually be a quicker way to sew the block together? This would use fewer patches. The seam allowance could lay flat and you would not have to press the seams open. Well, keep on reading, because I have a super cool tutorial for you!

https://www.easypatchwork.de/downloads/


I've been diligently writing the instructions for the Mosaic Jig Quilt Along. I am also a strong believer in making everything in patchwork simpler - simpler block construction and using time-saving shortcuts. So, when drawing up the Mosaic Jig block in EQ8, I chose to remove the typical lines in the center (album block) so as to use fewer patches.


I cut out my shapes and thought it could be easier to sew on the diagonal rather than horizontal. And you know what? It really is quick and easy to make this way! The extra bonus is clean and crisp seam allowance They just seam (pun intended) to lay perfectly!


Here is the front of the block. I didn't fuss with the seams at all. I don't think I ripped any of the seams out either. (I love to rip seams!) I just sewed the block together and finger pressed the seams with my finger nail and iron-pressed after the block was completely constructed.


I am totally happy with this result. : ) I incorporated this method into the Mosaic Jig Quilt Along as well. Of course, you could still assemble the block in horizontal rows, but when everything falls into place, why hassle?

I wrote out step-by-step instructions in a pattern format of how to construct a block in diagonal rows and saved it into a PDF for your convenience.


Thanks for joining and learning about this block construction method. You can download a PDF of the instructions on my website under the Downloads tab at the top of the page. You can also find patch sizes for these blocks - 5", 6", 9", 12" and 15". Try it out and tell me if this works for you.

Happy patching!

Monday, October 8, 2018

Happy Halloween Sewing

Hello Everyone,

Halloween is right around the corner! I am starting to slowly get in the Halloween mood with the fall weather, misty mornings and soups of the season. A new block jumped into my head on Friday and Winnie the Witch was created. She measures 6" x 11". This block is a stand alone foundation paper pieced block (FPP) or can be mixed and matched with the Paper Dolls Mini Collection for added diversity. If you want to add a hat to any of the other paper dolls, trim the seam allowance of the head segment back 1/4" then add the hat segment.


This is a PDF instant download, so if you already have the original pattern, it is a quick download you can sew up today without the added hassle of postal shipping and waiting time.

You can even add it to the Fall Freebie from last year. Did you download it last year? You can now download directly from my website without being tracked!


Look what I whipped up this morning in EQ8! I used the freebie pumpkin block from last year, added one of the bats from the Bad Kitty pattern as well as two witches (one reversed hairdo) to make this cute table runner. Wouldn't this be sew much fun to make??

17 1/2" x 32 1/2" Halloween Table Runner

You could even combine it with the original Bad Kitty Pattern and rename it - "Little Witch in the Pumpkin Patch."

If you don't like the witch and simply must have a very naughty kitty cat, there are still patterns available on Etsy. This is a combination of foundation piecing, regular piecing and appliqué.


You can even draw up your own very special Halloween table topper and have some spooky witches peeking out of the pumpkins.


Have a great week everyone! Happy Halloween Sewing!

Wednesday, September 27, 2017

fall freebie

To all of you fall and autumn lovers out there, here is a freebie featured on Craftsy. I intinially intended for this 10 x 12 inch block to be an add-on to the "Bad Kitty" pattern, but you can use it as a stand alone mini quilt, large mug rug or small placemat.

I really enjoyed making this and love how you can design things by sewing small squares and flipping to make new edges. I was tempted to design it with foundation paper piecing, but thought everyone (new quilters and experienced) would benefit more from the sew, cut and flip method. Enjoy!

https://www.craftsy.com/quilting/patterns/pumpkin-freebie-from-easypatchwork/511831
Pumpkin Freebie from easypatchwork found on Craftsy

Here is what a quilt could look like by exchanging the cat and bat blocks for the double pumpkins and a stand alone pumpkin block:

Design Idea

There is no free tutorial for the "standing alone" pumpkin. If you are interested in this version and would like to buy the printed Bad Kitty in the Pumpkin Patch pattern (no PDF), I would be happy to give the dimensions to you. Please contact me karen@easypatchwork.de

If you make something with the free mini double pumpkins, please post on social media using the hashtag: #easypatchworkminipumpkins

Thank you and enjoy your fall!