Showing posts with label pincushion. Show all posts

Tuesday, January 15, 2019

business as usual

What can I say? It's business as usual, or is it? The longer I have a blog, website and pattern business, the more I get frustrated with the whole deal. Please don't get me wrong. I love designing, writing patterns and teaching. I truly do. It is just the flip side that I don't like. Let me give you a little peak into the other world.

I have been publishing my patterns and free tutorials in the Internet since 2012. I originally wanted to share my knowledge and help others to learn and feel good about themselves and their patchwork achievements. When someone makes one of my designs or uses my patterns and shares a photo of what they have sewn, it gives me such a great pleasure in knowing that someone liked my design enough to try it out and more importantly, succeeded in doing so.

I am also there for you when it comes to trouble-shooting. When a customer is having a problem with a design, I answer questions freely and quickly, because I truly want them to achieve their design. With most of my designs and tutorials, they were provided without any financial compensation. That was okay with me. I only wanted a small thank you or a photo with a kind pingback to my website or blog. With my IKEA Cutting Table Hack post, I received many pingbacks, comments, questions and a few "thank you's." It is the all-time favorite post on the blog! It was even linked up in a book.

My husband's beautiful work, my idea, my photos!

Some of my most popular posts, original ideas and copied patterns are as follows:
It plays on my heart, when I see a pattern or design that copies one of my ideas without reference to my original design. Why should it, you ask? The fact is - designs are not copyrighted! So I shouldn't feel offended. Only the text on how something is made is copyrighted as well as the actual photo. That is true. (And sometimes, even I fall into the trap of seeing something, getting an idea and running with it to form my own design.) However, you should reference your ideas! When I submit patterns to magazines, I am required to reference my ideas no matter how trivial. 

What really bothers me here, is that more and more people, robots, websites are using my free ideas and tutorials to make profit for themselves! I check the statistics of my blog and Etsy shop sometimes to see where traffic is coming from. I was alerted once to see a website was referring readers to my shop. That sounded nice, new customers. How exciting! When I looked at the website in more detail, I realized the owner had downloaded and used my photos without my permission and posted them on her website (with a reference to my shop). That's fine and dandy, you say? No, because her website was set up with a great deal of advertising, tracking and was set up to make her a profit (Google Ads, etc.) with readers coming to her site. These are things I do not wish to associate with. I asked her to remove the post with my patterns. She kindly removed them in a prompt manner. I never would have known about this, if I hadn't checked the traffic to my sites. Please remember this too. All photos are copyright protected. You are not allowed to download and post other people's pictures without consent. They do not need the © sign to be copyrighted. The MONA LISA would look a little funny with © Leonardo DiVinci, now wouldn't it?


Another point in case is the Mini Pinwheel Pincushion. I love the look of fabric manipulation. I saw an idea of a fellow patchwork group member, Birgit M., a few years ago making 3-D pinwheels for a baby quilt. I loved the idea and wanted to try it out. A pincushion is the easiest was for me to try out a new technique with quick results. I made a pin cushion and quickly posted on Instagram with some general dimensions and explanation - no tutorial.

It was quickly written into a tutorial by another person and posted on their blog with reference to me. I WAS given credit for the idea. This same idea (mini pinwheel pincushion) was copied by one of the largest fabric and quilting supply retailers in the United States. When I saw their video demonstration on how it was made, my heart dropped. There was no reference to my idea nor to anyone. When I inquired about their idea, their response was, "we saw an idea on Pinterest." What is your take on this? 


Case 3: At Christmas this year, we didn't give a lot of presents, and I didn't receive anything quilty from my family. I spoiled myself with a new book about miniature quilts after the new year. I waited for the right moment when all of the chores were done and a free moment was earned to sit down and thumb through the book. I was dumbfounded when I came to a page showing the "Forgotten Five Mini Quilt" called something else of course. The cutting and assembly directions were written differently, but it was still the same design and effect. The setting was in a 4 x 4 grid rather than my 3 x 3 grid. I believe coincidences can happen, and that people can truly get the same idea when designing. (It has happened to me, too. I try to retract my idea when it does though.) However, this idea was given freely and posted without compensation for the Moda Bake Shop in 2014 written by me. So, did someone take one of my designs for their own profit? I earned recognition for the post but was not financially compensated. 

Moda Bake Shop Tutorials

When I design quilts and pincushions, I research for new ideas. I want to create something unique and that hasn't been done before. I write and publish (what I know as) original ideas. It can also be the case that the ideas are already out there, and I have overseen them myself when researching. I apologize if one of my designs has coincidentally copied an other's idea for profit. Please bring it to my attention if it has happened.

Case 4: With the help of one of my friends, Carmit E from Quilting Rainbows., I was alerted that a robot on Instagram had copied a photo of one of my creations and reposted it on their account. 

New Pattern in the Works
Yes, there was a pingback or reference to my account just like in Case One about the patterns. Don't expect robots to ask for permission to repost. The purpose of robots is to find, harvest and repost good, clear photos without identifiable watermarks or copyrights to gain followers. These are not real people! They have no interest in you. This account will, in turn, be sold for a profit. You might gain a couple of followers by the action, but the bots profit much more. This is happening on a more regular basis and that is why I am trying to watermark all of my photos with a copyright sign. Interesting fact: Press ALT + 0169 at the same time on your keyboard. There's your copyright symbol.

I was able to report the repost on Instagram (with a long, lengthy process) and it was removed within a couple of days. I think it was removed quickly, because the photo was copyrighted with a rather pale print which was missed by the robot.

I am also more careful about my followers on Instagram. I do check to see who is following me and if it could possibly be a fake account. Fake accounts are usually the robots who are harvesting beautiful, clear, high-resolution photos for their own profit. They also redirect followers from your account to their account. Beware of 10K+ accounts following you without even liking one of your photos. It is purely for the redirection of your followers to their account.

With all of my frustration, I still am designing. In fact, I created a new pincushion - the Prairie House Pinnie featuring a log cabin design and prairie points. I made this as a special thank you to my #tobeabee German patchwork girls. I wanted to make them something nice. I am terrible at remembering birthdays too. So this is my present to them! I patterned the pincushion as less of a profit for myself and more of a security so others will not copy and profit from my design. I now know, that when I show something on Instagram or here, it will be copied. I'd better get the pattern out first, before someone else does.

Patterns on Etsy

So, it is back to business in a more secretive and sensitive way. I cannot show little glimpses of what I am working on no matter how exciting it is, because the fear of theft is just too great.

I would really like to know your opinion on this. Maybe I see this all wrong? Maybe everything posted on the Internet should be free for use by everyone? 

Saturday, September 17, 2016

orange peel pincushion tutorial

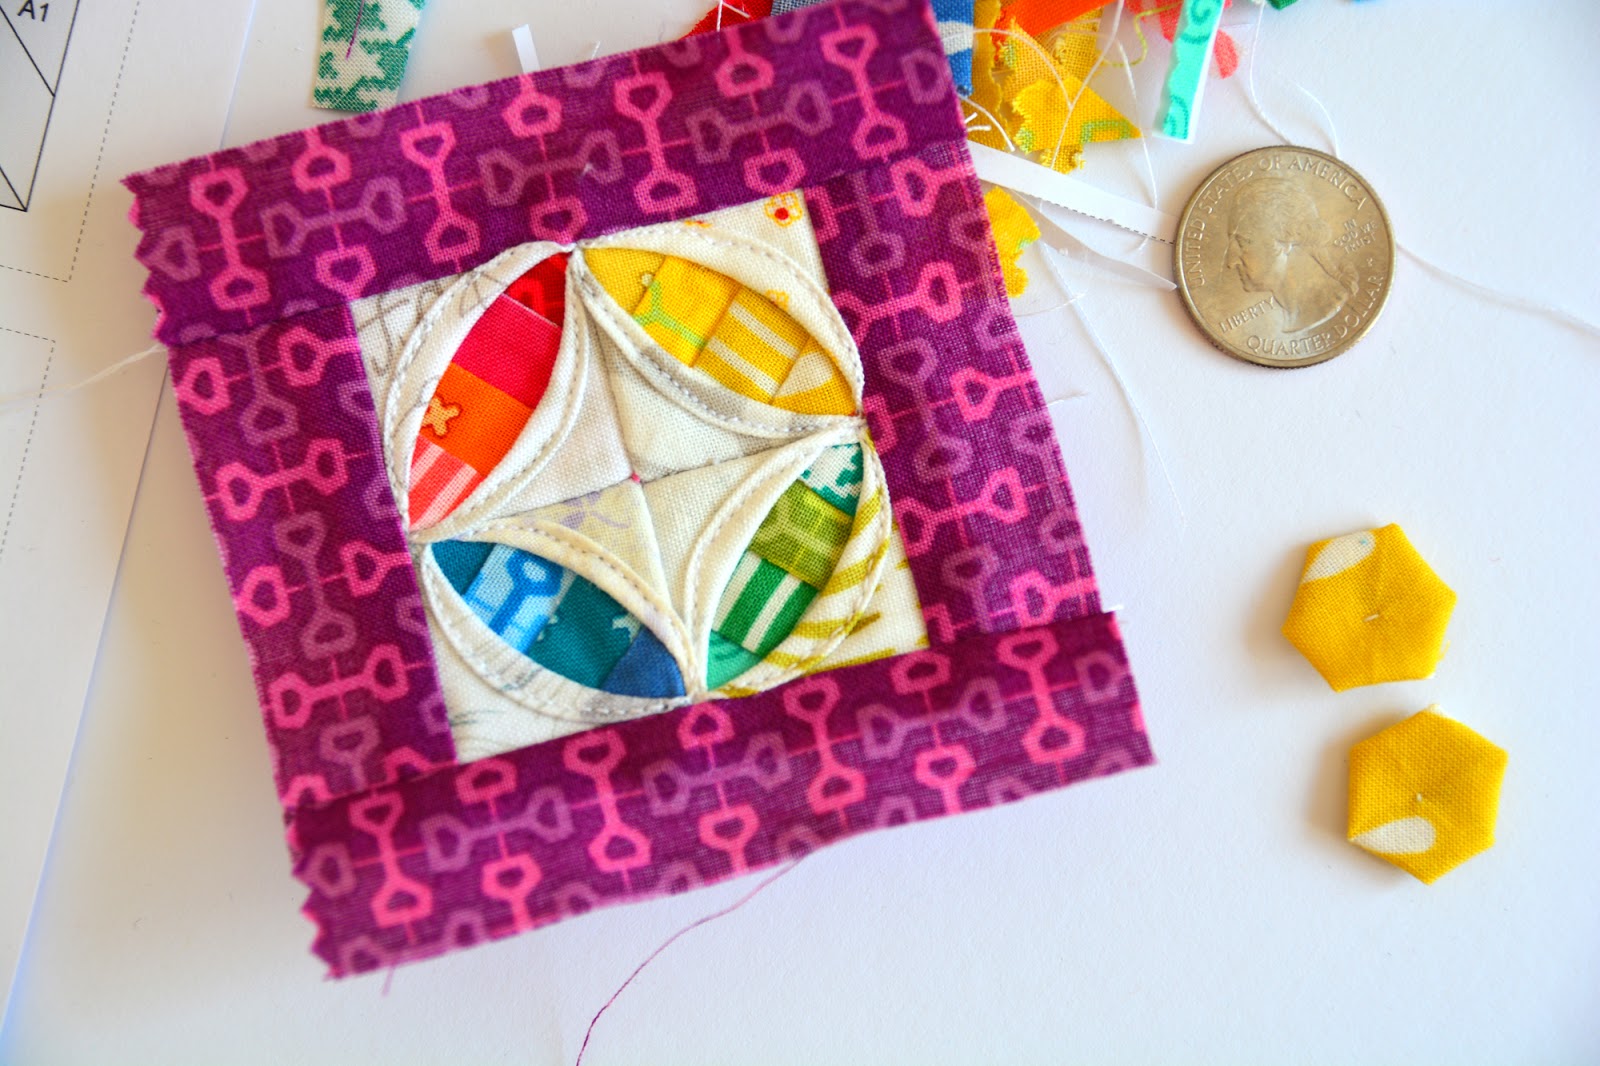
It's been a while since I put out a free pattern or tutorial, and I know how you all just love freebies...so here is a goody for you. This idea came to me last Friday when I was walking home from dropping my daughter off at school. I love orange peels and cathedral windows, and this is a combination of those. I made (4) one-inch scrappy (foundation paper pieced) diagonal blocks, basted two pieces of same-sized squares folded on top and sewed all four blocks together. I threw on a couple of borders, sewed some lovely Robert Kaufman Essex Yarn Dyed Linen in black on the backside, filled with cornmeal, finished off with a ladder stitch and there you go. BOOM!


If you didn't quite understand all of that, we'll go through this step-by-step. I love pictures and hope there are enough for you to understand where this is going.

Materials Needed:

Various rainbow scraps for diagonal blocks
(8) 1 1/2" x 1 1/2" Low Volume fabric squares for windows
(2) 1" x 2 1/2" purple fabric strip for border
(2) 1" x 3 1/2" purple fabric strip for border
(1) 3 1/2" x 3 1/2" backing fabric
about ½ cup or 100 grams of small grain or filling 
such as crushed walnut shells, cornmeal or grits
(4) 1-inch diagonal strip block templates for foundation paper piecing. You can make your own or download the complete pattern found on Etsy.
Hand sewing needle & thread 

  • Makes one, three-inch pincushion. 
  • Knowledge of foundation paper piecing is required. 
  • Knowledge of how to make a pincushion can be helpful as well as a ladder stitch. 
  • Please use a scant 1/4 inch seam allowance when sewing. 
  • Reduce your stitch length to 2.0 or 1.5 to allow for easier paper removal and better endurance.


Let's get started....

Cut out four templates from the one-inch diagonal strip blocks template sheet free for download.


Make four blocks in four different colorways using the fpp templates. I chose yellow, red/orange, greens and blues. Make sure you overlap the seam allowance on the foundation paper with ample fabric. You can always cut off the extra.


Trim up your one-inch blocks using the seam allowance guide on the back, a good ruler and rotary cutter. (My, oh my, how those blocks look so much cuter when they are squared up.) Take your papers out now. (I left mine in.)


Take all eight (8) 1 1/2" x 1 1/2" squares and fold them in half diagonally. Press with a warm iron. 


Place one folded square (now a triangle) over each foundation pieced block as shown below.


Place the second triangle over the block and baste using a 1/8th seam allowance. Please be very accurate in this step. If you are not, the windows might not line up on all four blocks. (The blue and green diagonal strip blocks are swapped in this foto. I just wanted to see if you were paying attention.)


Once all four blocks are basted, connect two blocks. Press seam open or to one side. Sew the other two blocks together and then connect to make a four patch. Attach borders.


Open your windows and pin in place. Now doesn't that look pretty!!?? 

NOTE: You could put a little piece of fabric in the middle to make a Cathedral window.


Still using a stitch length of 2.0 to 1.5, top stitch the windows in place.


Layer your backing fabric and pincushion top right sides together (RST). Sew around the outside leaving a two inch gap along one side to flip. Trim corner at a 45° angle to get a sharp corner. Flip. Thread a hand needle with a color matching your backing fabric. 

Sorry - NO FOTO for this step! I was sewing instead. : )


Start to sew the seam shut. Using a small funnel, fill your pincushion up with the small grain filling. I used (organic) cornmeal, because if flows through my funnel easily and has the right grain size.  Continue to sew the seam shut and filling with more grain. All finished.


You also can make a classic orange peel like this:


Or you can make all kinds of other variations such as only using one triangle per block.


Or flip the block around to make a pinwheel.


I would love to see what you can come up with. Please post your photos on Instagram so we all can see. Use the hashtag #eporangepeelpincushion. Or drop me an email. 

If anything is unclear, please feel free to drop me a note, and I will try to make it clearer for all.  


Thanks for dropping by! Happy sewing! Feel free to look around. I have a lot of other tutorials and freebies here on my blog.

Tuesday, March 29, 2016

sew pixel play pincushion tutorial

Hi Everyone!

If you don't already know me, my name is Karen. I studied International Business with an unofficial minor in German. After working a few years in Germany as a productions planner/controller/analyst, I tied the knot and opted for the simpler life as a mom. I now live in southern Germany with my bi-national family close to Ulm which is between Stuttgart and Munich (or closer yet, Augsburg). I do not have the opportunity to talk too much to other Americans, since I am totally integrated into the society and don't live in a major city where other Americans live. So, I use my blog, website and Instagram account to keep my English active. I discovered my passion for "patchwork" over a decade ago and have been trying to learn every technique known in the quilting world since then; I love learning! Some of you might know me as a mini quilter, but I truly love all techniques, as well as traditional and modern quilting.

I have been posting lots of pictures lately on Instagram of a technique that I have been using on pincushions, mug rugs, and pillows that I call "sew pixel play." A lot of your have been asking how I do it. This is actually a very old technique. I am very happy to be bringing it back again, because it brings up so many new possibilities.

First, let me tell you how I learned about it... I had always seen gridded fusible fleece in the stores for sale and wondered about it. I remembered seeing a video or demonstration about adhering squares to the fleece and sewing in rows with one long seam. I couldn't really understand why someone would use this technique, because I thought this was just too time-consuming for "normal" chain piecing rows together. So this technique logically didn't fit into my repertoire. At this time, I was also participating in the Doll Quilt Monthly swap and wanted to learn more about miniature quilts. Then I found this fantastic book by Paula Doyle called Mini Mosaic Quilts. It re-explored this technique and used it for making small, miniature quilts. Since then, I have been incorporating it into my patchwork when I can break down a design into pixels or squares. For sewing on a small scale, this technique is quick and extremely accurate. Some of you may know this technique as "Quick Piece Tiny Squares" or "Using a Quilter's Grid." Since I do it usually on a small scale to get my seams perfect; I call this technique "Sew Pixel Play."


Now onto the step-by-step tutorial for making a pincushion using this technique.

You will need the following materials in addition to your basic sewing notions:
  • Lightweight scraps
  • Gridded fusible fleece
  • or graph paper + glue stick 
  • or waxed paper + ruler + pencil
  • Small grain for filling the pincushion + funnel

For the pincushion, I used the one-inch fusible grid. I prefer to use waxed paper and draw lines on the rough side with a regular pencil and ruler. Although this is more time consuming, it is more accurate when you crease your lines. You may also use regular paper and a glue stick. Draw your own grid at one-inch intervals or print out from EQ7. Make sure you are accurate when you crease along the lines. Use a good light source.


Cut 7/8 inch squares
  • 5 white
  • 5 magenta
  • 5 dark green
  • 4 light green
  • 4 red
  • 4 pink
  • 4 purple-blue
  • 5 single misc. colors

Cut one backing fabric 3 1/2 inches.

Cut fleece or prepare your paper to get a 6 x 6 grid. No need to worry about added seam allowance; it is already included in the one-inch squares.

Lay out your squares onto your fleece making sure you have the fusible side up! You will not be able to see the lines very well. If you are using waxed paper, your lines will be on the backside. If you are using paper/glue stick, your lines will be also be on the backside as well; you need these lines for folding and sewing later.


Fix with a warm iron. And yes, my ironing board cover looks this crappy. I go through a new one about every two months, because I am so hard on it!


Fold over the first column inward right sides together (RST). Make sure your "fold line" from the gridded fleece or paper is exactly in the middle when folding over. This is to ensure you sew an accurate line.


Take it over to your sewing machine. Reduce your stitch length. I reduced mine from 2.5 to 1.5 stitch length. This is to keep the seam together when press the seam open to reduce bulk.


Feed your sewing machine. Sew an exact scant 1/4 of an inch.


When you are finished with the first vertical column, flip your piece over front to back. Fold your next column inward matching up the line again which becomes a guide for sewing. Sew the next seam.


Flip front to back. Fold next column inward using your line on fleece as a folding line. Sew.

Continue sewing, flipping and creasing until all columns are finished. If you forget to flip your piece, don't worry, it will just  bow to one side. ; )


This is what you get when all columns are finished.


Cut your seams open by cutting the back of the seam allowance as shown. Repeat for all columns.


Finger press and then set all seam allowances OPEN with a hot iron with the steam off. Sorry about that ironing board again. It really looks used up!


Now lets work on those rows.

Fold your first row inward RST, making sure you see the "fold line."


Sew using your fold line as a guide. Pull your piece slightly taut as you sew.


I find it easier to keep the rows straight by lining up the outer edges and pinning in place a couple of times. Flip and repeat sewing as you did in the columns.


This is what it looks like when you finish all rows.


Now it's time to cut open the seams for the rows.


Press all of the seams open. Press the hell out of the front so it lays flat. Leave all paper and fleece inside. Do not attempt to tear it out. It won't hurt the pincushion but only stabilize it more. Square up and trim to 3 1/2 inches or whatever you get. (Mine measured 3 1/4 inches in the end.)


Trim backing fabric to the same size.


Lay Front on the backing fabric, RST. Sew around pincushion leaving an opening for flipping. Backstitch at start and stopping points.


Trim the corners and flip right side out. Use a pair of scissors to get the points sharp.


Thread a hand stitching needle with thread matching the backing fabric. Start to stitch the opening closed using a blindstitch. Stitch half of the opening closed. Carefully fill the pincushion using the funnel and cornmeal or other grain; shake some grain into the pincushion shaking it down and pushing into the corners with the small funnel. (I used polenta or cornmeal.) Continue sewing the opening shut and adding more grain until the pin cushion is nice and plump.


It is now finished! The possibilities of this technique are endless I look forward to seeing what you make with it. Please share with us all using the hashtag #sewpixelplay.

I hope you enjoyed this Sew Pixel Play Tutorial.

If you have any questions, please don't hesitate to ask. You can always email me directly. Thanks for stopping by!