Showing posts with label easy. Show all posts

Sunday, June 18, 2023

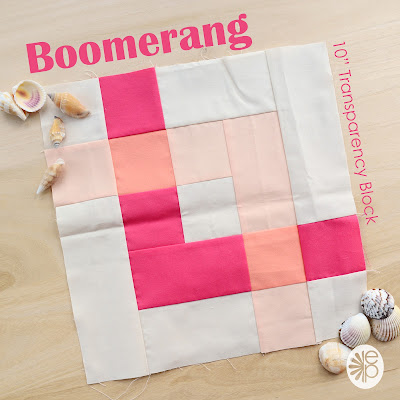
Boomerang - FREE 10" Transparency Quilt Block

Hi there! Thanks for joining me today! Yes, I see that there wasn't but one post written in 2022 and this is the first post in 2023! We are going to have to change that!

I have been very busy the last few months exploring transparency in quilt blocks. When I was doing my research, I couldn't find any quilt samplers just a few blocks. Then I started to explore transparency in several different quilt blocks and decided we needed to change that too.

I don't want to give too much away, but I wanted to share with you a little glimse of what is to come. I have a FREE Quilt block to share with you. Maybe you will get the transparency bug as well.


You will be redirected to my website on the DOWNLOADS tab where you can click on the file. Try the block and please post on Instagram using the hashtags: #boomerangeblock. You might be automatically entered into a really fun and exciting contest. But once again, I don't want to give too much away. 😉

Don't forget to check out the other freebies and downloads as well. Or stop by the pattern shop on Etsy. There are over fifty digital and hardcopy patterns to choose from. You are bound to find something you like with varying skill levels.

Stay tuned for more transparency fun! Check it out on Instagram @easypatchwork.

Tuesday, December 28, 2021

2022 Fairy Duo - Leticia and Jolean

Hi there! I am really excited to share with your the newest set of easypatchwork Paper Doll Fairy, Leticia and Jolean. This collection of fairies is made with 16" foundation paper pieced figures, a great size to get into paper piecing and create a throw pillow for a special person in your life.

The 2022 fairy, Leticia, was just too cute not to have her sister, Jolean, join in the celebration this year. Each one has her own style. You can even mix the heads, bodices and dresses from both figures to create more if you wish.


Leticia - 2022 Fairy of Joy

Allow us to introduce, Leticia, the 2022 Fairy of Joy. She is an English fairy princess who would like to guide you through the new year. May you entrust her to show you the simpler things in life. She is straight-forward, and elegant. You could also envision her as a garden fairy, a strawberry fairy, or forest fairy with her cute acorn-shaped cap.


You can sew her with a variety of different colorways such as monochromatic (shown above) or even in a rainbow color schemed shown in the lower right corner. I truly love using the dark background on the fairies with their soft creamy, blush skin tone. If you wish to create more contrast, use a variety of values such as light, medium and dark for the figure to stand out. Get creative with different hair and wing colors. Create a whole family of different rainbow-colored fairies. More design ideas as well as a coloring sheet are found in the pattern as well as step-by-step directions with illustrations.


Jolean - 2022 Fairy of Inspiration

Sister to Leticia, Jolean is a dazzling fairy of inspiration. May her spunky character and love of life inspire you in your creative endeavours. She is slightly more challenging with her cute hair buns and layered dress. She is very proud to sport her fairy-tipped ears. Her plunging neckline shows her high self-confidence and love of her own body.


She is also sewn in a monochromatic color scheme with creamy, blush skin. There so many more options to color her though. Just take a look below. More designs in the pattern as well as a coloring sheet and step-by-step illustrations with explanations.

This sister duo can be purchased together to mix and match and make even more figures. Here are some more ideas. Have fun and explore new ways to create by skipping over sewing lines or adding your own.

If you wish to make one or both of the 2022 fairies, you can purchase them on Etsy for a limited discount until January 2, 2022. Discount is already applied in the store - no need for more coupons. 

Have a happy and creative New Year 2022!

Friday, February 1, 2019

beginner sampler

Hi everyone! I wanted to share with you the sampler quilt I made for a beginner's patchwork class. I designed it from simple blocks that are essential for skill building.

First, I searched for a nice mix of small, medium and large prints with a variety of values (light, medium and dark) and decided on a monochromatic color scheme of blues/grays/white.

Fabrics from Makower, Moda and Robert Kaufman

I worked on the computer to design a 2 x 3 horizontal layout, sampler quilt using some of the oldest and traditional blocks - Nine Patch, Shoe Fly, Courthouse Steps, Trip Around the World, Old Maid's Puzzle and an Economy Block. I decided to frame most of them to "update" their style. It also makes it easier to unify them in a sampler quilt. All blocks measure 12" after framing and most measure 8" (Finished) before framing (if you want to make your own).

Mock Up Quilt Pattern

The Nine Patch and Shoefly blocks  introduce how to use a consistent seam allowance when sewing as well as how to nest seams. The Courthouse Steps will show how your blocks can tend to bow when adding new strips. The Trip Around the World is another one to show how to nest seams. The Economy block demonstrates that every time you add a new segment, you will have to square up the block again. This is shown in further detail with the Old Maid's Puzzle.

My biggest challenge was sewing an accurate 1/4" seam allowance. I have noticed when sewing a lot of foundation paper piecing (sewing on paper), I tend to forget where my 1/4" mark is on my presser foot is when returning to regular piecing. It also varies when sewing small and large blocks. The more seams you have in a block, the scanter the seam allowance will be when pressing seams to the side. If you are pressing your seams open, it won't matter as much. 

I also had some indiscrepancies in my cutting instructions which allowed me to produce this beautiful smaller sized Trip Around the World block. I think it will make a nice demonstration mini quilt for pressing directions.

Trip Around the World & Other Sampler Blocks

After sewing all of the blocks together and adding the border, I started to think about the quilting. (I have the biggest quilting phobia.) I first thought about a customized quilting, highlighting each block. This is a beginning quilt for quilters, so that idea was scratched. I am also a little disappointed when there is too much pull from the needle which produces puckering in the quilting on domestic machines. I thought of an allover design with simple diamonds. To avoid major visual complications, I decided to start with initial quilting lines that would not disrupt the Old Maid's Puzzle. I drew a quilting line 1 1/2" to the right and to the left of the diagonal line that intersects the four blocks pictured below. If you want a quilting line that goes exactly through the diagonal on most if not all blocks, you will need to space your quilting lines 2 3/4" apart and not 3".

Quilting Line Mock Up in EQ8
I used a different marking pen on this quilt. I chose to use one that disappears with air rather than water (purple Prym Trickmarker). I liked this better, because I hate removing the marks with water afterwards. They always seem to reappear too! I only drew the first initial lines as my starting point. After I drew those, I pin-basted the quilt. My prefered batting is a cotton-polyester 80/20 blend or something that allows the quilt to lay flat. This one is a low-loft batting.

Initial Parallel Quilting Lines to Form a Diamond Pattern

I tried something else, for the first time, which worked out really well. I decided to use electrical tape to mark the follow-up, parallel quilting lines instead of marking them all. This method allowed me to stand up after quilting each line and reposition the electrical tape. This probably wasn'tthe most efficient way, but it was a great workout. :)

Straight Line Quilting Made Simple with Electrical Tape

When quilting on the domestic machine, I first checked my tension by sewing on a test quilt sandwich. I adjusted both the bobbin thread to be looser as well as the top thread. I usually quilt with cotton thread on the top and polyester on the bottom. I find when using cotton in my bobbin, I have too many tension and machine problems. I also like a nice, heavy, punctured line of quilting to show on both sides.

I used a stitch length of 3.5 and 40/3 Superior Threads 999 (light gray) on top. I put a topstitch quilting needle into action as well.

Close-Up of Stitches

I just love a striped and plaid binding and couldn't wait to start cutting this one up. I only needed four strips of 2 1/2" wide fabric for double-folded, continuous binding. I will admit, I just sewed the first strips together at first. Then I stopped myself and re-sewed them. It irritates me when the stripes don't match. To get the repeat to match up, I first ironed the strip (I was adding) on a 45° angle. Then I glued it to the first strip exactly over the striped lines. I pressed with a hot iron and then sewed scantly to the right of the ironed line. I cut off the excess and pressed the seam open.

I connected the binding strips with a 2.0 stitch length, because they would be pressed open to reduce bulk. If your stitch is too long, the seam won't be stable anymore and will have the tendency to rip out.

Perfectly Matched Binding Strips

I applied the binding with a 3/8" seam allowance and a 3.0 stitch length.

When connecting the beginning binding strip to the ending binding strip I usually go back to this method. Overlap your beginning and ending binding strips with about a 10 inch unsewn. Cut off one of strips the length of the width of your binding strips. For instance, if the width of your binding strip is 2 1/2", the overlap with be cut to 2 1/2". If your width of binding is 1 1/2" (single fold binding), you will overlap the binding by 1 1/2". Then butt the ends perpendicular (90°) and sew through the diagonal line (drawn here in red) as you would piecing continuous binding strips.

Preferred Method of Finishing the Binding Tails 
To connect the binding to the back of the quilt, I machine closed by basting the binding strip to the quilt with Clover Clips. I machine stitched in the ditch from the front with matching thread on the front (blue) and back (in gray).


I did not iron the quilt after basting. Sometimes I do iron the binding before sewing it down, but this time I didn't. I am very pleased with the way this sampler quilt turned out.

Beginning Sampler Quilt

If you are new to patchwork and quilting and would like to make this quilt, you can sign up for this class in March at Stoffwelt in Neu-Um, Germany.

Here are the stats of the quilt: Beginner Sampler Quilt 2019 from easypatchwork
  • Dimensions: ~33" x 45"
  • Block Size: (6) - 12"
  • Fabrics: 7 Different Fabrics 
  • Time: ~ 20 Hours of Work
  • Technique: Pieced
  • Batting: Freudenberg 279
  • Binding: 3/8" Wide, Machine


Thank you for joining me today and reading about this sampler quilt. Enjoy your weekend.

Tuesday, February 23, 2016

danube river quilt

Hi Everyone! This winter has been rather strange here in Germany this year. Unlike last year, this year has been really mild. We have received very little snow, and the temperatures rarely have dropped below freezing. Today, you can hear the birds chirping their lovely songs which awakens the springtime feelings in all of us. This can only mean, it is time to get out the fresher colors from your fabric stash and make something exquisite! I have an exciting new quilt for your featured in Quilts from Quiltmaker's 100 Blocks, Spring 2016! Get your copy while they last!

Check it out at your local newstand!

Although I am an American, I live in Germany, close to Ulm, along along the Donau (Danube), which is the second largest river in Europe. It originates in Donaueschingen (Germany) and continues throughout 10 countries ending in the Ukraine and emptying in to the Black Sea. It is a major international waterway for southern Europe. Living here along the Donau definitely influences my day-to-day routine and life. Although the winter months can be very gloomy, the summer months bring many bicycle tours and walks along the river paths.

Danube River as seen from the Münster (Protestant Church) in Ulm, Courtesy Wikipedia

I designed a block last year called Danube River Block, #1163 for Vol. 12 of Quiltmaker's 100 Blocks capturing my love of the Donau. I used Tokyo Train Ride from Sarah Watts for Cotton + Steel Fabrics and a Timeless Treaures Sketch Basic in Iron. The darker gray chevron reminds me of the river and the medium tones to the right and left signify the birds soaring along the Danube River. I really enjoyed designing this block and had even more fun sewing it together which is easy peasy when you follow the directions in the magazine : )

Danube River Block, #1163 from Quiltmaker's 100 Blocks Vol. 12

The Danube River Quilt uses a basic horizontal setting which gives a vertical illusion of water flowing through the quilt. You can quickly adapt it to any size quilt and would also be a great block for a single pillow cushion. You could also make this happy, scrappy with one shade of blue for the water and all those unused scraps for the birds. Have fun with it!

Featured in Quilts from Quiltmaker's 100 Blocks, Spring 2016

A very big heartfelt thank-you goes out to Peg Spradlin for sewing this quilt perfectly together using Blueberry Park by Karen Lewis and Color Union by Studio RK, both by Robert Kaufman. She did an incredible job at matching up all those HSTs! I love the quilting as well...how the water flows over the chevrons. Thank you, Peg! Seeing this quilt come together so exquisitely, I want to had over the task of making these blocks to my To-Be-A-Bee Group here in Germany.<<wink>>

So where can you get this magazine? It should be hitting your local quilt shop on March 1st for all those located in the United States. For those located in Europe, it may take a little longer. Check out your local quilt shop or bookstore to pick up your copy today! Thanks for stopping by!

Thursday, November 26, 2015

the one-hour basket reviewed

I sewed my very first "one-hour-basket" for a friend of ours that was having their first baby back in February/March of this year. I used the Fabric Basket Tutorial from Trina from Will Cook for Shoes for the Fort Worth Fabric company. I thought the pattern went well. The handles were on the front and back of the basket. Then I saw the 1 Hour Basket all over IG (Instagram) with the hashtag #kelbysews. This basket looked a little better, peppier with a little more structure and with the handles on the sides rather than in the middle. Aha...another pattern which must be greatly improved? Kelby also lists her free tutorial Craftsy. (As most of you, I like to find free patterns!) I downloaded her version to see what the difference was and if I would agree with her changes. I read. I practiced. I bought more supplies and wracked my brain about improvements and modifications. Here is my opinion after making a couple of baskets from both tutorials!


The Fabric Basket from Trina is a very nice, tall and roomy basket made from quilting quality fabric that is quilted on the outer shell. The outer shell fabric is fused and quilted which gives it stability on the outside. The inside is also quilting quality fabric (which is rather thin) but reinforced with a medium weight stabilizer. The basket holds its shape nicely. The handles fold to the left and right in the middle of the basket. The inner and outer shells are connected at the top and flipped at the top.

Fabric Basket Tutorial from Trina of "Will Cook for Shoes"

Updated

The 1 Hour Basket from Kelby is modified version. I say this clearly because of the dates of when both were published. The basket from Trina was published in February 2015, and the one from Kelby in March, 2015. What changed in the new basket which sparked the need for a new tutorial?
Although the 1 Hour Basket was as published after the Fabric Basket Tutorial, Shelby assured me she has never seen this tutorial before today. My apologies. What is different in Shelby's tutorial? It is improved and a bit more thought out especially if you don't want to do a lot of quilting.
  • the newer version is compact - overall dimensions make it shorter and longer.
  • bottom base is slightly smaller.
  • clears up the discrepancies for inner and outer shells (inner lining must be smaller to prevent puckering when top stitching the two shells together. The inside was sewn with a 5/8" seam allowance rather than 1/2".) The picture below shows this puckering on the original basket.

  • changes the handle positions to the ends
  • handles are longer and narrower
  • uses home decor quality fabric (definite plus for stability)
  • changes the base to be slightly narrower (square base pockets reduced from 3 1/2 inches to 3 inches)
  • flips through the inner lining at the bottom rather than the inner shell at the top  (a definite plus for the overall design)
  • does not reinforce the inner lining to make a shell

Both baskets look amazing don't they?? I agree, the photos are great!

Fabric Basket Tutorial from Trina
 
1 Hour Basket Tutorial from Kelby Sews
Here is what you don't see or what you see when you put them side by side:

Fabric Basket Tutorial vs. 1 Hour Basket Tutorial

So you can understand, these baskets were slightly modified by me when I sewed them together. Here is what I changed to each basket:

Basket from the Trina Basket

  1. Not quilted.
  2. No use of stabilizer on the inner lining to make a shell.
  3. Handles on the ends instead of side.

Basket from the Kelby Basket

  1. Sewed the handles like the first basket by folding in the center once and folding in again 1/4 on each side.
  2. Added cotton batting and quilted on the crease lines.
  3. No use of home decor fabric on outer shell nor on the inner lining.
What is your opinion? Which one do you like better?

I clearly like the second (improved) version better. But I think it all depends on how you are going to use the basket. If you are going to use it for holding diapers, I would clearly use the tutorial from Trina exactly as she wrote it, but I would flip through the top, because it makes for a better finish. I would also quilt it very tight for added stability. I think the handles on the front and back are just fine, but may need to be adjusted for your purposes. If you want a more decorative basket, I would pick Kelby's which proves to be a quick sew with little hassle. I would adopt the handle size and length from Trina's tutorial though. I think they look better short and stump. But keep in mind, both of these baskets take a while to sew. Make sure you read through the tutorials carefully to understand.

If you are interested in how I fine-tuned the basket for my Christmas gifts, stay tuned.....Part 2 will be posted tomorrow!

If you are celebrating Thanksgiving today, happy Thanksgiving!! I heard that the Carolina Panthers will be playing today! Yeah, go Panthers!! We will be celebrating our turkey day on the weekend when we have time to enjoy it, without the stess of work and school. Thanks for stopping by!

Friday, July 17, 2015

bavarian apron tutorial for a Dirndlschürze

My, oh my! Where have I been?? Once again Instagram has taken over me, and I have neglected to post here on my blog. I've been such a bad girl. ;-) The truth is...the end of school madness has taken over. We have lots of birthdays filled with end of school parties, and there is just no more time to get the sewing done!

We recently celebrated the 198th Sommerfest in Leipheim where both my of my kids participated. What is the Leipheimer Kinderfest? It is a celebration of ending the Hunger in Leipheim after a three-year struggle of bad weather an not crops two hundred years ago. I guess you could also call it the Hunger Games. It starts out as a huge parade beginning at the town center and leads to the Sportheim (Sports Field) where Grades 1-7 participated in a group dance/performances.

198th Leipheimer Kinderfest Parade - the Beginning

Surprisingly, not all boy were not required to wear Lederhosen...just the boys from my daughter's class and the 7th Graders who were required to wear the pre-made costumes that are worn every year for the past uh...50 years!? They are not very attractive, and they must hate it with a total passion that they have to wear them!!

Costumed Seventh Graders ready for their "Hunger Games"

The girls from my daugther's class were asked to wear Dirndls which is a Bavarian style of dress with a "corset-style" top and an apron. The rest of the girls were asked to wear their best dress. I didn't want to buy a new Dirndl for this one event, and kids grow so fast don't they?! Instead, we had a new all-white dress for my daughter that could be "pimped" to make look Bavarian. All I had to do was make an apron or Schürtze!

My daughter in the 198th Leipheimer Kinderfest Parade

Two days before the big parade, I took it upon myself to get to it and start sewing my daugther's apron! I looked high and low for a good tutorial on a Dirndl. I found this video on YouTube which was a good start, but there was no free pattern. This pattern helped me out even more. But, if you can't understand German, then you might be lost. I will walk you through the process if you would like to make one.


A Dirndlschürze or apron should be
  1. Slightly shorter than the dress or Dirndl,
  2. Cover the entire front of dress from side seam to side seam,
  3. Tie in the front of the dress,
  4. and have a button tab to hold it to the center of the dress.

I used a 3/8th inch seam allowance instead of 1.5 cm.

Materials Needed:
  • 2/3 yard fabric (My daughter's choice - Kate Spain's Honey Honey by Moda)
  • 3 x 13 inch interfacing
  • 3" long elastic band for button tab
  • matching thread
  • sewing notions
  • dressmaker's ruler (tape measure)

First, you need to write down all of your measurements. Measure the width from side seam to side seam of dress yoke (A - 12 inches). I wanted the apron to go slightly higher than waist level to drop right below the lace on my daughter's dress yoke but end higher than the lace at the bottom. Most Dirndls stop one inch above the length - mine about five inches. Measure the length of dress front (B - 15 inches). My measurements are 12 x 15 inches
 
Apron Front:
Cut one rectangle 16 x 25 inches

Formula for your custom  measurement:
Length + one inch x Width * 2 + one inch seam allowance on each side


You are going to fold the shorter sides in twice to get a finished hem. Mark with at 3/8th of an inch with a ruler and Frixion pen. Mark again at 3/8 of an inch parallel to the first line.


Fold over the fabric to the first seam and finger press.


Fold over to the second line and pin in place.


Sew hem using a scant 3/8" seam allowance.


Repeat for the Bottom Hem using a 1/2" seam allowance. Mark your two lines at 1/2 inch intervals.


Fold over using your drawn line as a guide. Finger press. Fold over again to next line. Pin in place. Press if desired. Sew hem using a scant 1/2" seam allowance.


Now you have an APRON FRONT without ruffles.


Now you will need to put some stay stitching in the top of the apron to make all those pretty ruffles. Sew along the top about 3/8" using an extremely large stitch or hem stitch. [Please ignore the black elastic band. I didn't use it.]


Take the bottom thread and pull to get some puckers or ruffles.


Pull from each end and smooth them out the ruffles along the entire length of front apron yoke.


Tie a knot in one end of the the thread to hold the ruffles in place.


Lay along a ruler to get a width of the starting measurement. Mine was 12 inches.


Tie a second knot in the opposite side and use pins to keep ruffles in place. Yes, there is a tiny knot in there. ;-) Set aside the APRON FRONT for now.


On to the APRON YOKE and TIE.

Take your original measurement (A). Add one inch to the length. Mine was 12".

From Fabric - cut a rectangle 3 x 13 inches.
From Stabilizer - cut a rectangle about 1/2 smaller than the fabric.

Apply stabilizer to wrong side of fabric.


Fold fabric inward along all edges. Press.


Fold in half lengthwise and steam press.


Dirndl Specialty: Make the button tab by cutting a piece of elastic 3" long. Sew to the top inside of the Apron Yoke.


Baste the front of the YOKE to the APRON FRONT using large hand stitches. Set aside for now.


Make the TIES by cutting 2 1/2" fabric strips. Your length should be 3 * (A) the yoke front for each side tie. Mine should have been 36". (Mine are actually shorter, because I was using up a smaller piece of fabric.)


Cut 2 - 2 1/2" x 36" from your main fabric

Sew along the length right sides together (RST) using a 1/4" seam allowance. Flip right side out. Flip one end in 1/4 inch; leave one end open - this end will be enclosed in the yoke. Stay stitch along all the three finished sides.


Insert the finished TIE into the YOKE. Pin in place.


Pin the back of the APRON YOKE in place enclosing the TIES and APRON FRONT.


Carefully sew along the YOKE making sure you catch the TIES, APRON FRONT and BACK of APRON YOKE.


Remove your basting stitches!


Now look at this glam Dirndlschürze! What a gorgeous apron for any dress! Attach a button to the dress you sewed the apron for. Finished! Remember, my ties are a little shorter than they should be. You should be able to tie a bow in the front.


Thank you for stopping by and reading my quick tutorial on how to make an apron for a Bavarian Dirndl. Are wondering if I have a Dirndl? Yes, I do! But it was just too hot for my winter Dirndl and I have yet to buy a summer one. I thought I would leave you a picture of my dear husband in his Lederhosen. ;-)

Father-Daughter

And a picture of my sweet daughter. I am so terrible at braiding hair, but I partly managed this french braid.

Daughter watching the Show

The kids rocked with their version of "Rock You," by the way! It was totally awesome and hilarious - Bavarian style!

2nd Grade Class Rocking to a Bavarian Beat

Weißwurst und Bretzeln!

Thank you for stopping by! If you find a mistake, please share with all of us. Hope you enjoyed the coffee and the tutorial.